Multi-Row Panoramic Photography Equipment Guide
This multi-row panoramic photography equipment guide explains the gear you will need to create stunning photographs of ultra high resolution.

In this tutorial, you will learn;
• how this special gear will solve errors you may be experiencing stitching images with your software.
• what parallax is and how to eliminate it from your images.
• how to find the nodal points of your lenses.
• the advantages of a multi-row camera rig, which allows you to pan horizontally AND vertically.
• why I use a unique custom rig (instead of a packaged kit) that I feel is superior and more efficient in the field.
To keep this guide simple and straightforward, we will not be discussing how to stitch your images together after a shoot, as there are already countless post processing tutorials available elsewhere.

This guide is designed to introduce you to a multi-row system which will solve many common problems and limitations that you may be experiencing while making panoramas. And once you understand the simple concepts I will present, a whole new world of compositional opportunity awaits.
We will break down my own custom camera rig piece by piece while explaining the what's, why's, and how's to not only create perfect panoramas, but also to make standard ratio images with much higher resolution than your camera can normally achieve with a single shot.

This new gear, knowledge, and some practice will allow you to quickly set up in the field to shoot perfectly overlapped rows of images that your processing software can consistently blend together with ease, while avoiding the pitfalls of parallax (explained later). The resulting high-resolution files will allow you to make prints of unimaginable size with razor sharp detail.
Proper Panorama Gear Solves Problems
Most of you will have successfully made panoramas with your camera clamped to a simple ball head. You made sure your tripod and camera were level, then rotated your vertically-oriented camera left to right across the distant scene. You carefully overlapped each frame slightly so Lightroom or Photoshop could stitch them together successfully later on. Presto. Works every time.

Processing software is so good these days that I've even made panoramas handheld by just turning my body between frames, making sure to use a shutter speed fast enough to avoid blur from camera shake. And these shooting methods are fine for scenes where everything is quite distant from your camera.

But what happens when you have foreground elements that are only a few feet (or inches) away from your lens, like a group of flowers with a distant mountain in the background? Following the same shooting procedures as above, you may notice that your processing software starts to have trouble stitching your files together properly.
The results may look terrible, with common issues like foreground elements that don't line up, ghosting artifacts, and areas of blurring. And sometimes your images won't even stitch together at all.
This problem you are experiencing is most likely parallax in your images. But before we learn how to eliminate it, we need to understand what it is and why it happens.
What Is Parallax?
Let's do a simple exercise to understand this phenomenon. Start by holding one arm outstretched in front of you with your thumb up in the air, then close one of your eyes. Align your thumb with a distant object. Now, keeping perfectly still, switch eyes.
See what happens? Depending on which eye is open, your thumb will appear to move left and right in relation to the background object, making them fall out of alignment. This happens because depending on which eye is open, you are actually viewing your thumb from a slightly different angle which makes the background appear to shift position.
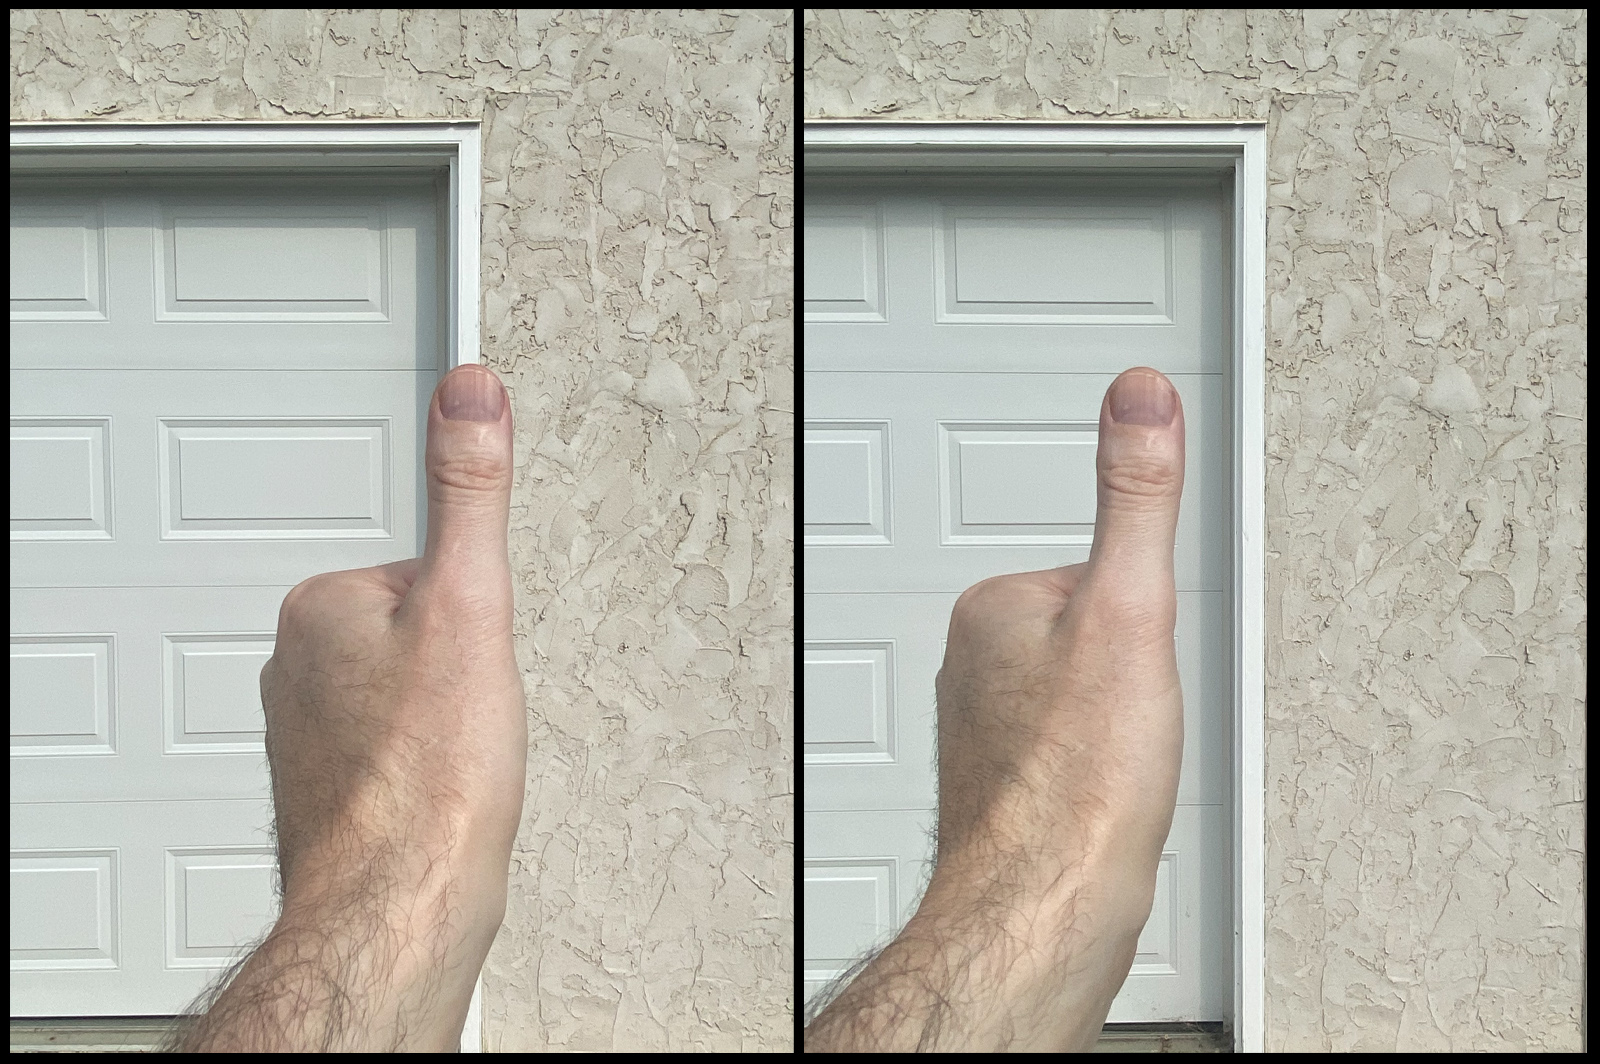
This is called parallax. It can be defined as the position of a foreground element (my thumb) appearing to change in relation to a background element (my door frame) when the camera lens (my eyeball) is moved into a different position.
When shooting panoramas, these 'parallax errors' make it difficult for your stitching software to do its job, because the elements in your scene are misaligned from frame to frame. The good news is that we can eliminate this problem.
Eliminating Parallax
When light enters the front of your lens, it passes through the aperture and converges at some point inside of your lens barrel. This point of convergence is like the 'eyeball' of your lens. In photography terms, we call it the nodal point.
Every lens in your bag has its own nodal point, and that point also changes slightly (assuming you are using a zoom lens) depending on the focal length you are using.

When you have your camera body attached to a ball head (which is the axis of rotation), your lens (and the nodal point) is obviously hanging way out in front of that axis (see above). In other words, when you pan the camera left and right you are actually swinging your nodal point around (the red dot), constantly changing its position, which causes parallax.
The way we fix this problem is to pull back and reposition the camera so the nodal point is directly over the axis of rotation, instead of your camera body. This is done with a piece of gear called a nodal slide rail with an extra clamp attached to it (below).

Simply fasten your camera into the mini-clamp, then clamp the nodal slide rail into your ball head so the nodal point of your lens (red dot) is directly over the axis of rotation (see below). Now, when you pan the camera left and right, the nodal point remains stationary.

The result? Parallax has now been eliminated, and all foreground and background elements in your scene will remain perfectly aligned frame to frame, no matter the camera position. Your processing software will not have any more issues stitching your files together.
Now that you understand how to avoid parallax using a slide rail, the next logical question should be, "How do I find the nodal point of my lens?"
Next, I'll show you a simple procedure to pinpoint exactly where it is.
Finding Your Nodal Point
For demonstration purposes (you can use any similar method), I set up a light stand in my driveway about 20 feet away from the garage door. Then, I placed some green tape vertically on the door itself.

Next, I mount my camera on my tripod with a nodal slide, positioning the camera a few feet behind the light stand, making sure it's level and dead straight in line with the light stand so it blocks the view of the tape. If you have a zoom lens attached, start with your shortest focal length.
Looking through my viewfinder (or in live view), I pan to the left and right (see below). If at any point the pole and tape fall out of alignment, the green tape will become visible. We know we have parallax, and have not found our nodal point yet.

Next, we loosen the clamp holding our slide rail (see below) and move the camera forward or backward slightly and reset the clamp, then repeat the panning procedure. (*Note - the nodal point is most likely close to the front of your lens, so that's a good place to start).

After repeating a few times, I eventually find the 'sweet spot' where I can pan left or right and the pole and tape stay in perfect alignment. When this happens, we have successfully found our nodal point.
Finally, we need to make a record of the focal length and slide position in relation to the marks on the clamp. There are numbers and hash marks on the side of the slide rail, as well as centering lines on your clamps. Record these numbers in a way that you can understand and recall later on.
You can either make notes in your phone, or type out the numbers on a piece of paper and laminate it to keep it waterproof, keeping it handy in your camera bag. Whatever works for you.

Note that if you have a zoom lens attached, as you change focal lengths, the nodal point can shift too. Using my 24-70mm lens as an example, I will find the nodal points for say, 24mm, 35mm, 50mm, and 70mm, and keep a record of where the slide rail is positioned for each.
Repeat this procedure for every lens in your bag, testing a few focal lengths on each lens. Having this information is invaluable in the field, allowing you to set up quickly to shoot in changing conditions, while being confident that you have your nodal points spot on for parallax free files, no matter the lens or focal length.
Single Nodal Slide Versus A Multi-Row Rig
Now that you know how to correct parallax with a simple nodal slide and clamp, you will be able to shoot single-row panoramas that your processing software can easily stitch together.

I highly recommend investing in an L-bracket (above) for your camera body as well. This will allow you to mount your camera vertically in portrait mode to record more of the top and bottom of the scene while shooting horizontal panoramas.
Although a simple nodal slide attached to your ball head corrects parallax, you will quickly notice it's limitations as well. For example, because the tripod and ball head must stay level while panning, all of your images will have the horizon line dead center in the middle (assuming there's a horizon in your scene). That can get boring in a hurry.
Additionally, what if your widest focal length isn't enough to cover the top or bottom of your scene? You can't tilt your camera up or down with the ball head, because your nodal point will instantly be off the rotational axis, reintroducing parallax.

The solution to all of these limitations is the multi-row panorama rig. This system will allow you to pan horizontally AND vertically, all while keeping the nodal point directly over the axis of rotation.
Make no mistake, this setup will allow you to create images that you never dreamed possible with perfect precision, unlimited freedom, and ease.
Let's see how it works.
The Parts of a Multi-Row Rig
Next I will show you all of the individual parts of the multi-row rig that I use in the field. Although there are many pre-packaged 'kits' available for purchase these days, most of them are missing some very important elements that I feel are essential for speed, accuracy, and practicality.
This is why I chose to piece together a custom rig instead, which I feel is far more efficient.
Each of the parts are either from the American company Really Right Stuff®, or the German company Novoflex®. Note that I am not sponsored by or affiliated with either company; I simply chose their products because they are rock solid, easy to use, and built to last a lifetime.
Starting from the ground up, I'll list the gear, then show you how the pieces work together. The model numbers are included as well for reference.

This carbon fiber tripod (above) is a rock solid beast, capable of holding up to 80 pounds. Extremely versatile with four-section legs, it can drop as low as four inches and extend up to over 68 inches. Perfect for when you're on the side of a steep hill and need the downward leg to extend really far for stability.

This leveling base (above) is a life saver and completely eliminates the need to level your tripod legs. A simple twist of the knob underneath loosens the bowl, then using the spirit bubble to level it, twist the knob again to tighten. It can swing up to 15 degrees in any direction. Now, anything you put on top of it will be dead level.
While most people use their ball head as the rotating base for their rig, that setup is less efficient for two main reasons.
1. Not only does the base of the ball head need to be level, but so does the clamp on top. That takes extra setup time and adds room for error.
2. Ball heads rotate freely, offering only the engraved marks on the base as a reference for how much you are panning between frames. Not only does this require more concentration while adding extra room for error, you cannot see the marks in the dark. Will you turn on your headlamp between each frame while doing your multi-row panorama of the Milky Way? Sorry, but that's just not practical.
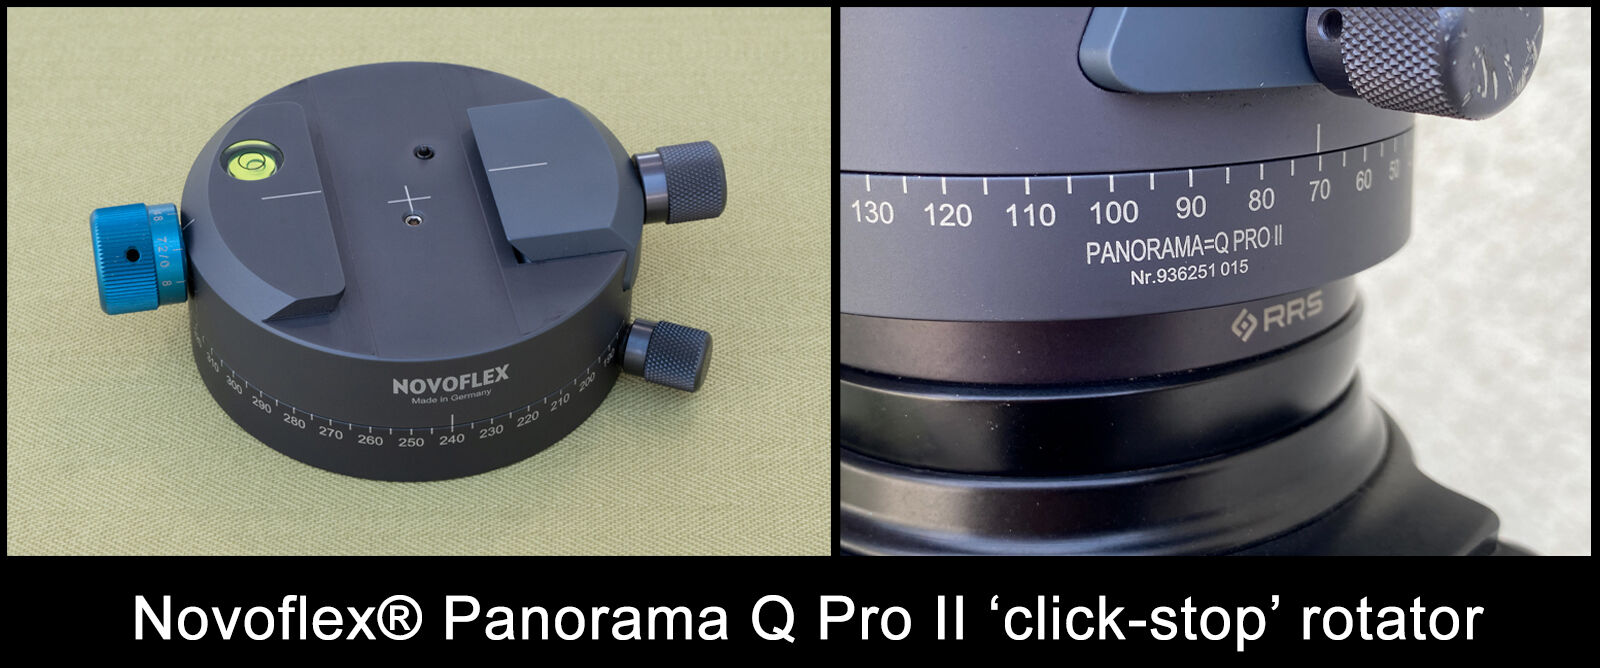
Instead of my ball head, I use this Novoflex® Panorama Q Pro II rotator panning base (above), which is the magic component of my rig. With a simple twist of the blue knob, the ingenious design incorporates adjustable 'click-stops' for perfect overlap of your frames at any focal length.
After setting your desired overlap, it works entirely by feel, not sight, to eliminate errors. It also has a setting allowing it to rotate freely if you wish.

This is the horizontal rail that I clamp into my rotator base (above). The engraved markings allow me to quickly position it perfectly every time depending on which lens I'm using.

This rail (above) forms the vertical part of my rig. The integrated clamp on the bottom end attaches to my horizontal rail. On the top end is a second click-stop rotator, the Novoflex® Q 48, which is permanently attached with a 3/4" long Allen set screw (which can be sourced from your local bolt supply store). Slightly smaller in size, this rotator allows the vertical panning of the camera with a lever to adjust the amount of rotation between clicks.

The last piece (above) is my nodal slide, which clamps into the Q 48 rotator. Identical to the other MPR 192 rail already shown, this one has a double mini-clamp attached, and can be purchased as a package as shown.
If you have a dovetail plate or L-bracket on your camera, position the clamp as shown above in the picture. If you are using a collared lens with a foot attached, the Allen screw can be loosened, which allows the top section of the clamp to be rotated 90 degrees. Another great design.

Finally, this padded neoprene pouch from LensCoat® (above) is perfect for storing and protecting each piece of my rig, conveniently rolling out for quick access and storing easily in the big pocket of my camera bag. It also comes with a durable nylon carrying bag with a handle and pull-string closure.
Kit Rig Versus Custom Rig
As mentioned, there are many multi-row gear 'kits' available that are shipped with all of the components you will need, which include a lower rotator and horizontal rail, vertical rail and upper rotator, and a nodal slide with a clamp for your camera.
Although I have not researched every model available, none of the units I've seen have click-stop rotators, which for me is a deal breaker. Be aware that some kits come with poor reviews in regards to quality and stability, especially if you are using a heavy camera and lens combination. At the end of the day, do your research and read reviews to find quality gear that suits your needs.
For myself, I simply choose to buy equipment that is well made, super stable, and does it's job consistently. In particular, my leveling base and click-stop rotators are indispensable for accuracy and saving time. And because I tend to take care of my gear, it was a one-time investment that will probably last forever.
Putting It All Together
Although the parts and pieces may seem complicated at first, it all goes together surprisingly fast in the field from practice and repetition. The images below illustrate my usual setup procedure.

First, I extend the legs of my tripod and place it on the ground at approximately chest height. The legs do not have to be perfectly level (saving time). I loosen the knob on the leveling base, use the spirit bubble to level it, then tighten the knob. Then I spin the main rotator onto the mounting stud, hand tight.

Next, I clamp the horizontal rail into the rotator, with roughly 2/3 of the rail hanging off to the side. Then, I slide the vertical CRD rail/rotator unit onto the horizontal rail, flush with end of the rail, and tighten.

Finally, the nodal slide is clamped into the upper rotator and the camera is clamped onto the nodal slide. That's it; all of the pieces are assembled in under two minutes. Now for some quick adjustments.

The center of the lens barrel must be aligned over the crosshairs of the main rotator, which is the center of rotation (green line in the image above). Point the camera straight down. Loosen the clamp on the bottom rotator and slide the horizontal rail into position (red line in the image) and re-tighten the clamp.
A trick for super accuracy is to look into the viewfinder on the camera, center your focus point, then move the rail until it lines up with the crosshairs on the rotator.

The last adjustment will be to set the nodal slide rail. Swing the camera back up so it is horizontal, and looking through the viewfinder at your scene, choose an appropriate focal length. Loosen the clamp on the upper rotator that holds the rail.
Referring to the notes you recorded previously for your particular lens and focal length, slide the rail backwards into position accordingly, and re-tighten the clamp. That's it, your nodal point is set.
You now have the ability to use either rotator to pan the camera left, right, up, or down, all while keeping the nodal point directly over the axis of rotation for parallax-free images.
Depending on your chosen focal length, the rotators can be adjusted for how much overlap you wish to have between frames (I recommend at least 1/3 overlap). This will create plenty of common detail in each frame as you pan for your stitching software to do its job with ease.
Unlimited Possibilities
As you will see, a multi-row panorama rig opens the door for creating high resolution images previously not possible with a standard ball head setup. Let's look at some images I captured using my rig and I'll explain how they were made.

I stood close to the edge of a cliff (above) to achieve this perspective of a waterfall valley in Iceland. Shot at 20mm with the camera in a vertical position, it is nine frames wide with my lens pointed slightly downwards into the valley.
I am a stickler for focus so I repeated four separate rows with different focus points, then focus-stacked each pano afterwards in post processing. Without a multi-row rig, parallax would have been a problem as the foreground elements were only feet away from my lens. As my nodal point was dialed in, my software had no problems stitching the scene together seamlessly.

This image from Gjáin (above) in Iceland is a double-row panorama shot at 34mm, with f5.6 needed in low light to achieve my desired shutter speed for water texture. Although it's probably overkill, I used very little overlap between frames for extra reassurance. The bottom row is 15 frames wide, and because of the limited depth of field, was repeated seven times with a different focus point for each row.
The lens was then tilted upwards, with another 15 frames for the upper background and sky, repeated three times for focus. That's a whopping 150 frames to achieve this shot, but it was all done quickly in fading light with the help of the click-stop rotators, which gave me perfect overlap of every single frame.
This goes to show that you don't always need to create traditional panoramas with multi-row equipment. The ability to pan horizontally AND vertically allows you to create ultra high resolution images cropped to a standard ratio.
Low Megapixel Camera? No Problem
Another major advantage of a multi-row system is the ability to create high resolution images even if you have a crop sensor or low megapixel camera.
Using a long telephoto lens (above) you can zoom deep into a scene and shoot rows of images, overlapping all of your frames by approximately 1/3 to be sure there is enough common detail in each photo for your software to blend together.

The resulting shots (above) are stitched easily to create the final image (below) which measures 11,100 by 7,400 pixels. Not bad for a 20 megapixel sensor.

Vertical Panoramas
Another great benefit of utilizing multi-row gear is the ability to create vertical panoramas. As seen below, you can simply swing both rotators 180 degrees, then attach your camera in the horizontal position using your L-bracket. The camera can be tilted up or down at any angle to record vertical images at higher resolution.

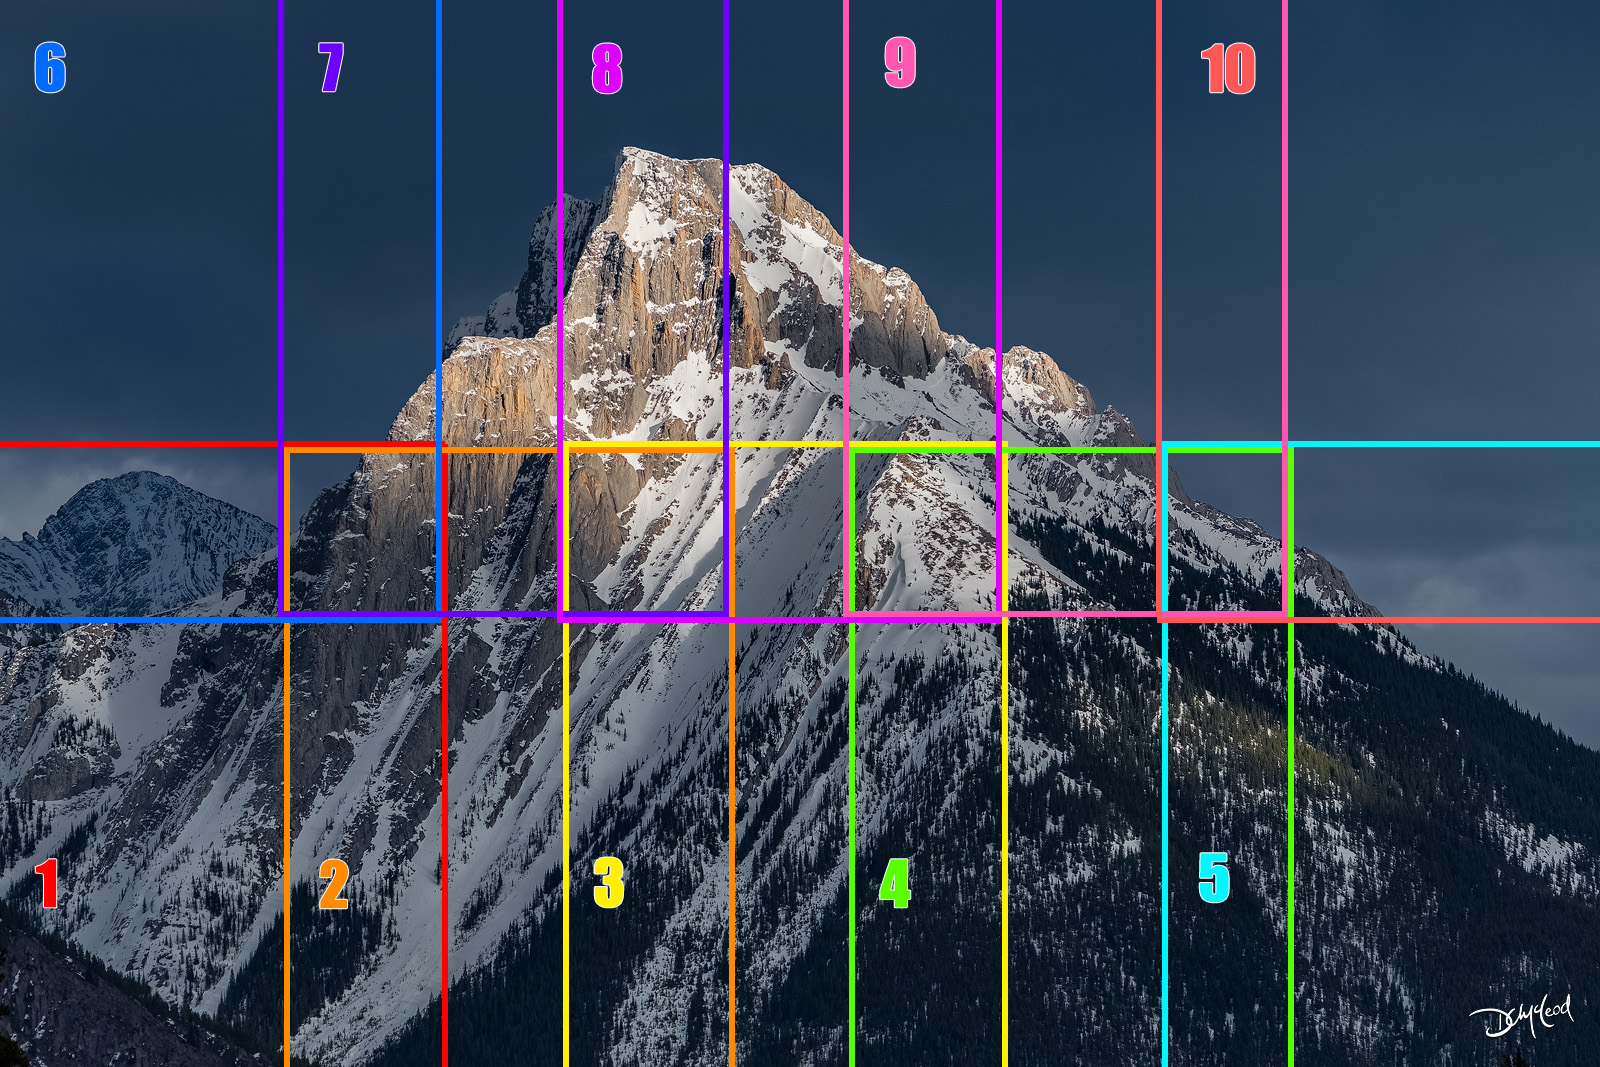
I used this set-up to capture the image (below) of the Three Sisters in the Canadian Rockies. Pointing my camera at the bottom third of the scene, I focused on the closest thing to my lens, and used the focus-shift feature on my camera to record multiple frames.
Then, tilting the camera upwards with sufficient overlap, I recorded the middle third using the same procedure. Finally, a third tilt of the camera upwards recorded the top third of mountain peaks and sky.

After focus-stacking each of the 'horizontal thirds' in Photoshop, everything was stitched together and cropped to a 3:4 ratio, coming in at 10,833 by 8,125 pixels at a resolution of 300 pixels per inch.
The focus stacking technique and panoramic method resulted in a master file of ultra-high pixel density, tack sharp foreground to background, that can be printed at unimaginable sizes.
Conclusion
As a professional landscape photographer, the addition of a multi-row rig to my workflow allows me to create extremely large prints with razor sharp detail that my customers love.
Repetition and practice make field decisions easier, leading to a more efficient workflow and stronger preparation habits before arriving on location.
I hope that this introduction to multi-row panorama equipment helps you to understand the gear, concepts, and techniques while inspiring you to take your photography to another level of creativity and quality.