How to Photograph the Northern Lights: Complete Guide
Learning how to photograph the Northern Lights requires more than luck—it depends on timing, preparation, and understanding how your camera behaves in near-total darkness.
In this guide, I’ll walk you through the exact techniques I use in the field to consistently capture sharp, detailed aurora images.
Successful aurora photography comes from preparation, not chance. The more you understand your equipment, conditions, and timing, the more predictable your results become in an otherwise unpredictable environment.
By the end of this guide, you’ll understand how to find, capture, and refine Northern Lights images with consistency—turning brief aurora activity into intentional, high-quality photographs.
Table of Contents
- Northern Lights Explained
- Resources for Predicting Aurora
- Planning Your Shoot
- Best Locations for Photographing the Northern Lights
- Essential Gear and Equipment
- Camera Settings and Focusing
- Tips for Composing Your Aurora Photos
- Editing Tips for Aurora Images
- Conclusion: Capturing The Magic
Northern Lights Explained
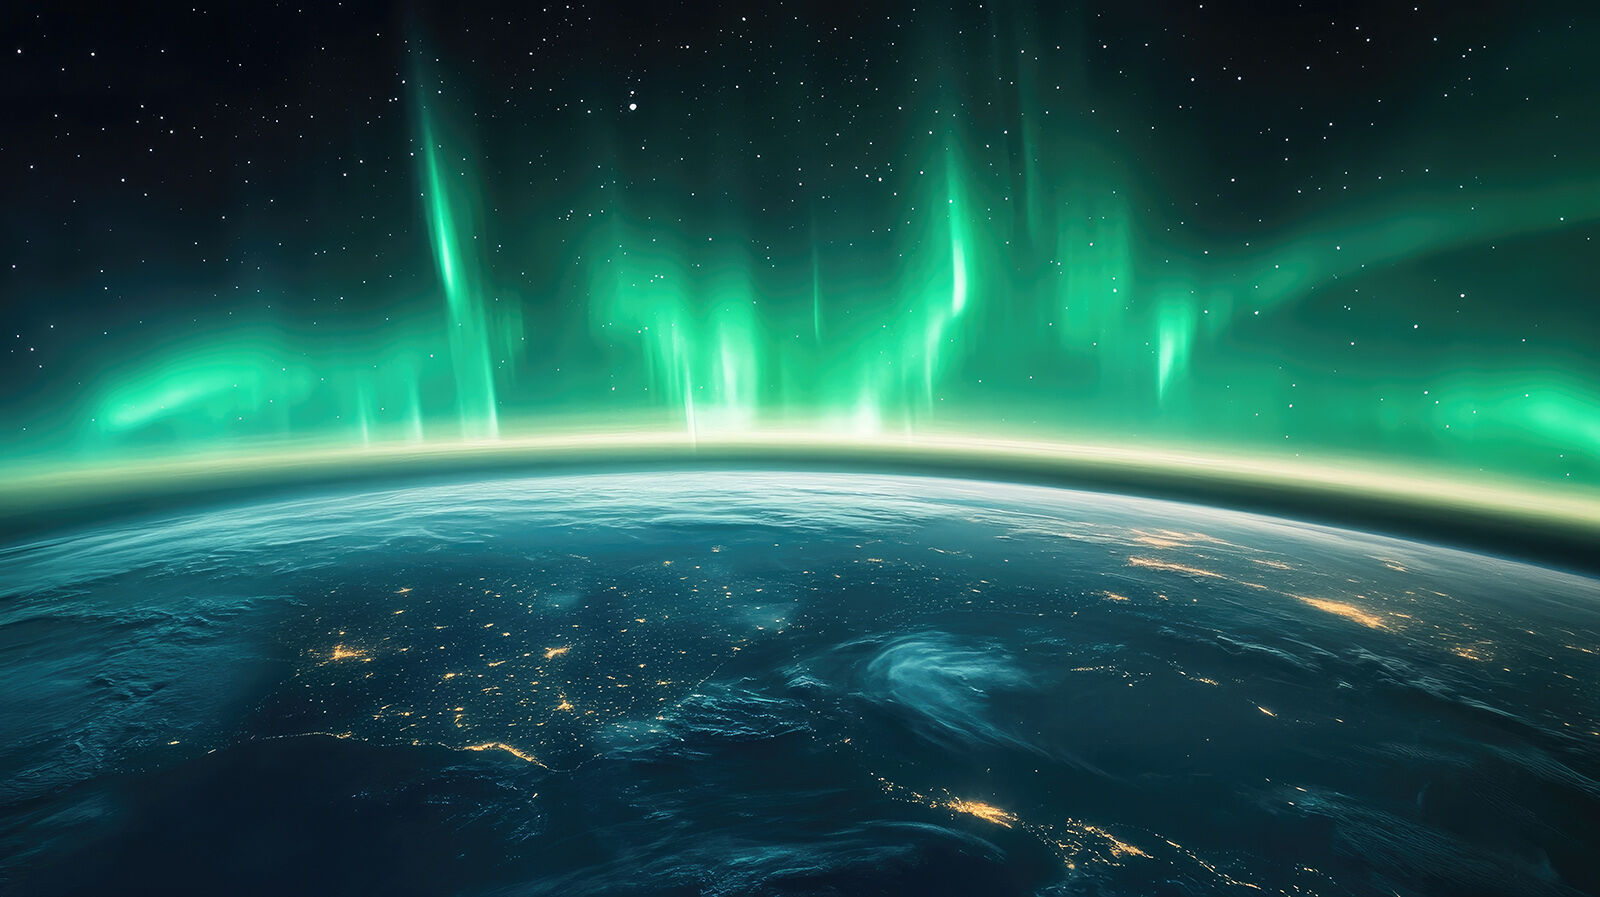
An aurora, often called the northern lights (aurora borealis) or southern lights (aurora australis), is a natural light display in the Earth’s night sky, primarily visible in polar regions. These displays form dynamic patterns such as curtains, bands, pulsating patches, rays, coronas, and fast-moving waves.
The northern aurora borealis (the focus of this article) is most commonly visible within the auroral oval—regions surrounding the Arctic including Alaska, Canada, Iceland, Greenland, the Faroe Islands, Scandinavia, Finland, Scotland, and parts of Russia.
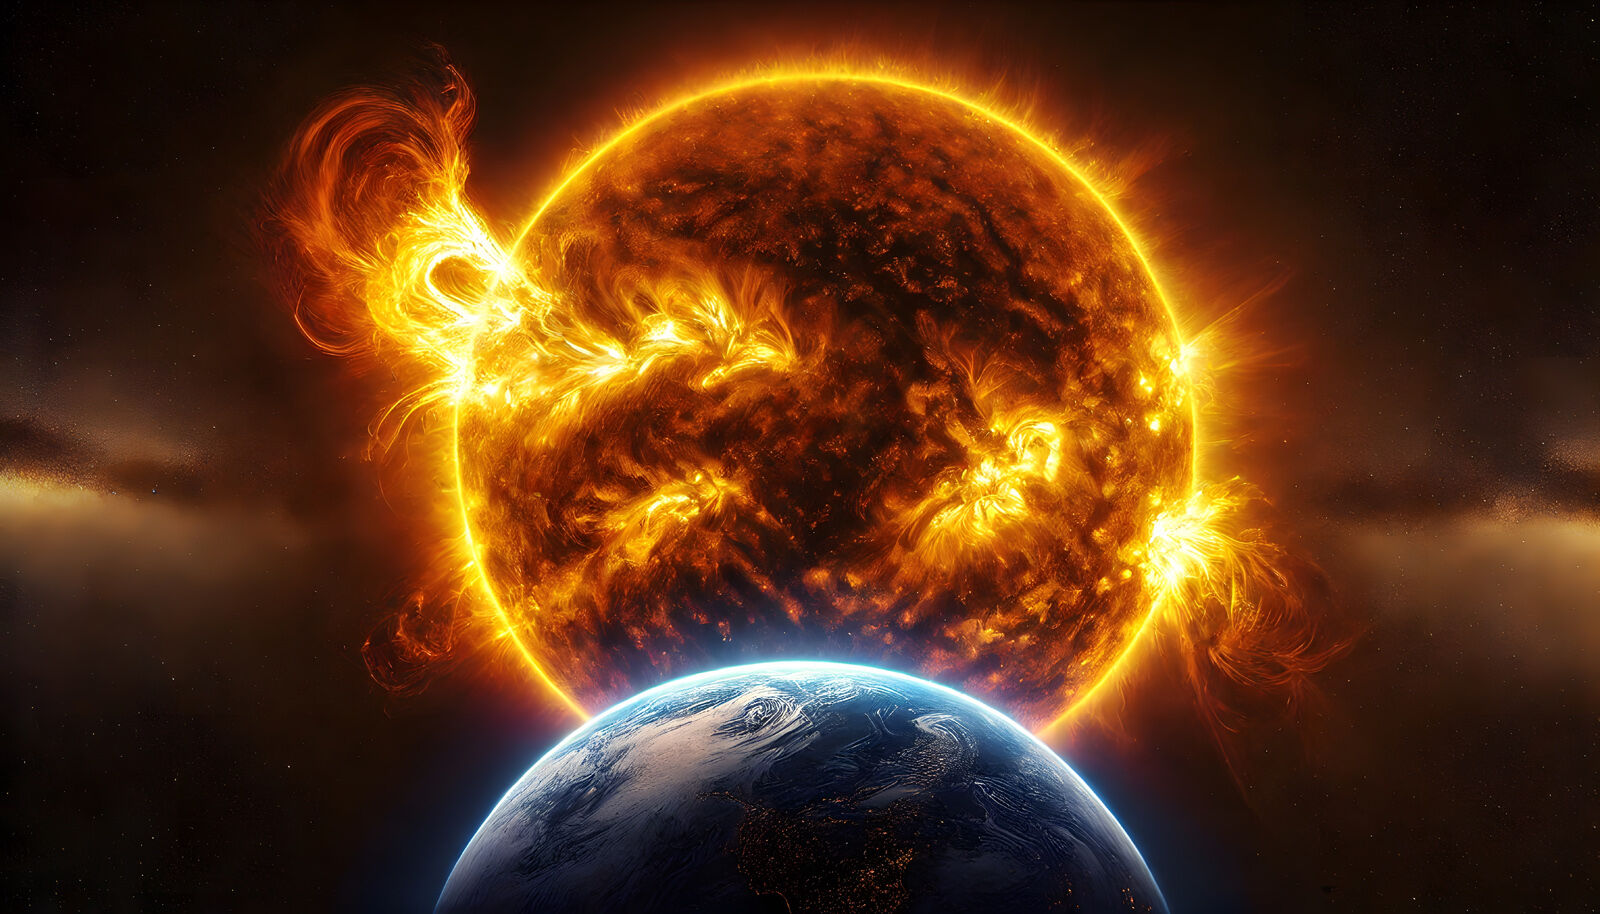
Auroras occur due to disturbances in the Earth’s magnetosphere caused by solar wind. The most intense displays are triggered by bursts of fast-moving solar material from coronal holes or coronal mass ejections (CMEs).
The strongest aurora displays are not random—they are the result of measurable solar activity interacting with Earth’s magnetic field.
Coronal Mass Ejections (CMEs) are large expulsions of plasma from the Sun. When directed toward Earth, they travel at extremely high speeds and typically reach our planet within 2–4 days.
When charged particles from a CME interact with Earth’s magnetic field and atmospheric gases (primarily oxygen and nitrogen), they create geomagnetic storms that produce auroral light displays around the magnetic poles. These storms cause the auroral oval to expand, making the lights visible at lower latitudes.
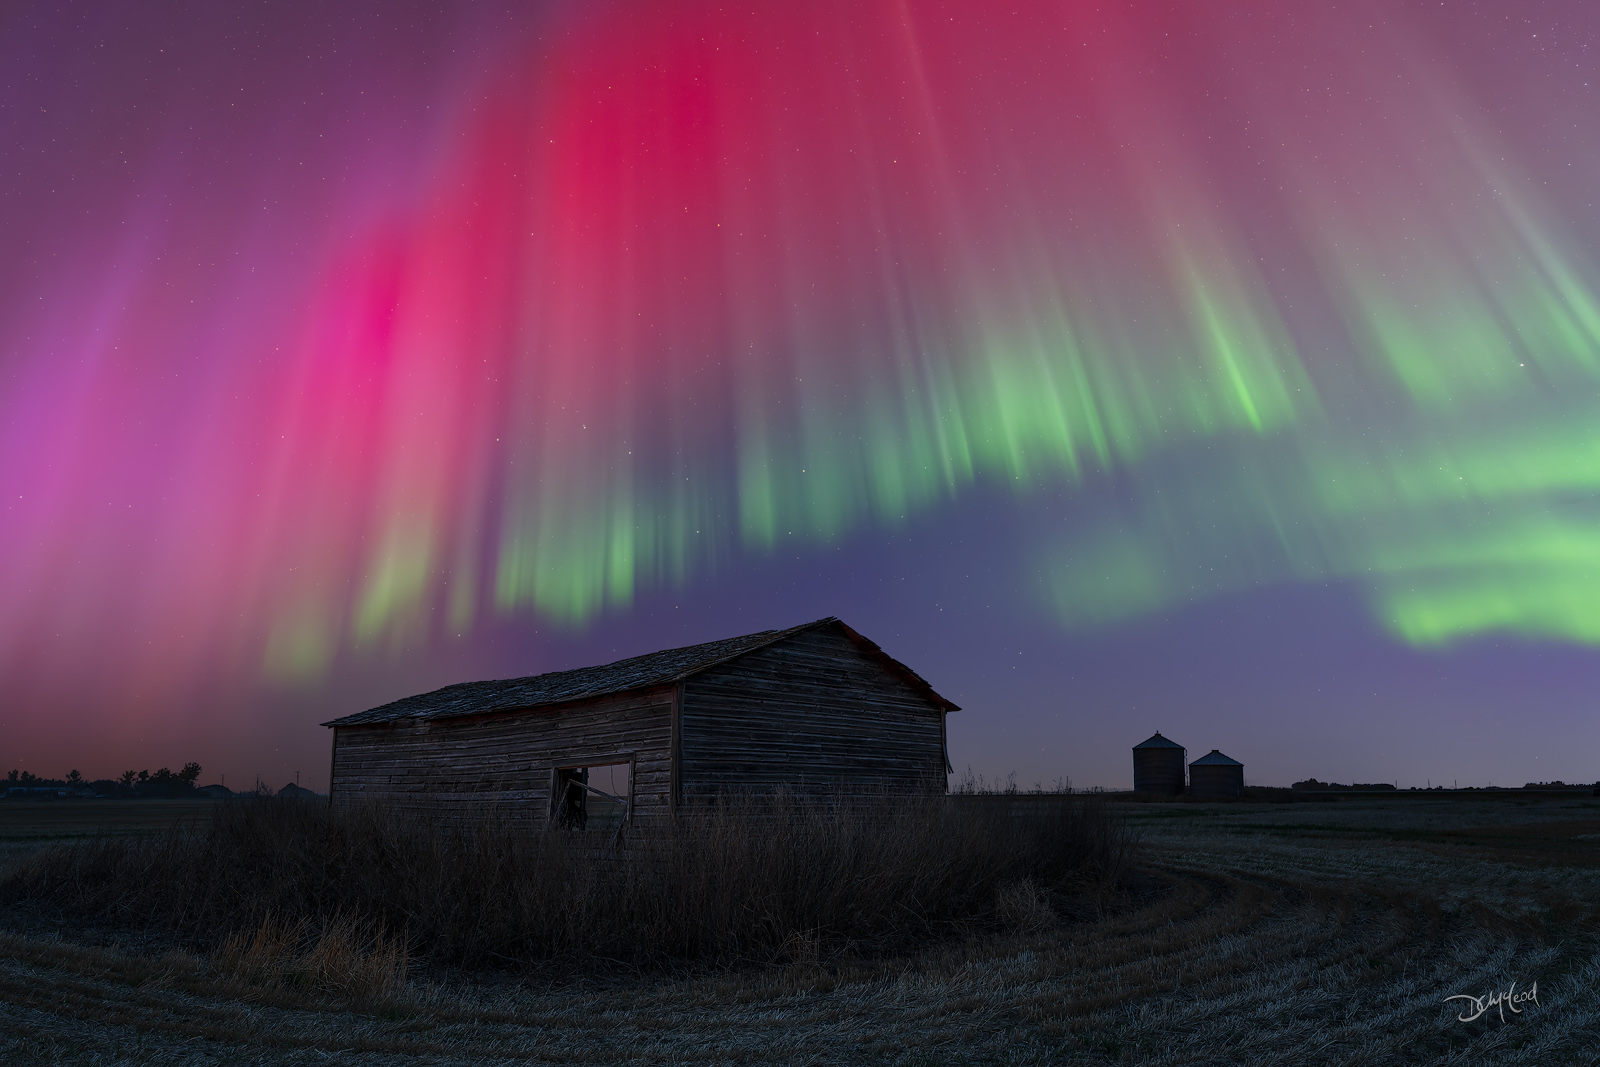
The colour of the aurora is determined by which atmospheric gases are being energized—oxygen typically produces green light, while nitrogen can produce purples, blues, and pinks.
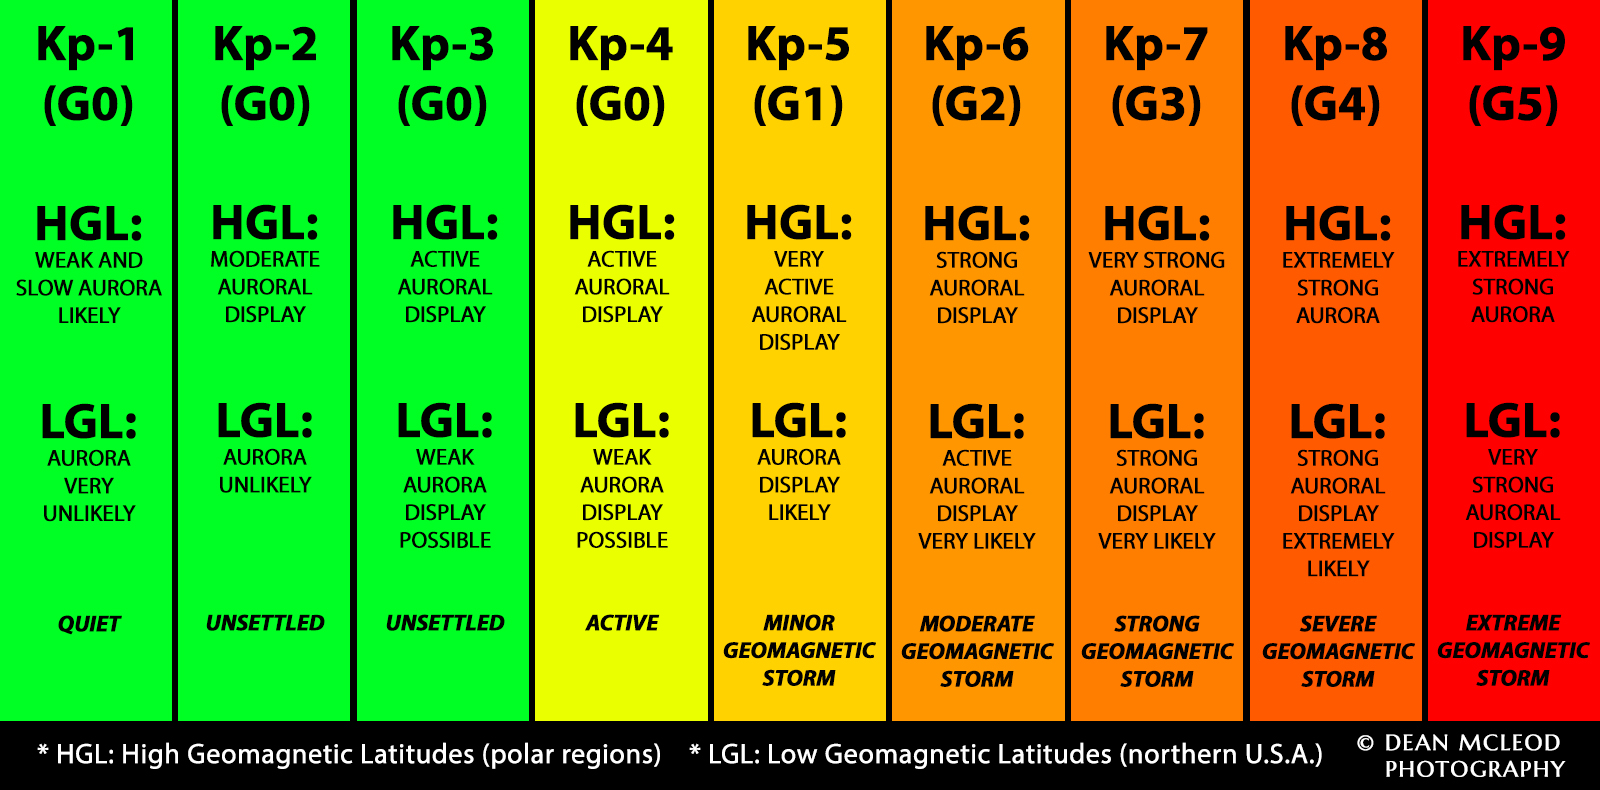
The intensity of auroral activity is measured using the Kp-index, a global geomagnetic scale based on 3-hour measurements from ground-based magnetometers. This also aligns with the G-scale, which describes the severity of geomagnetic storms.
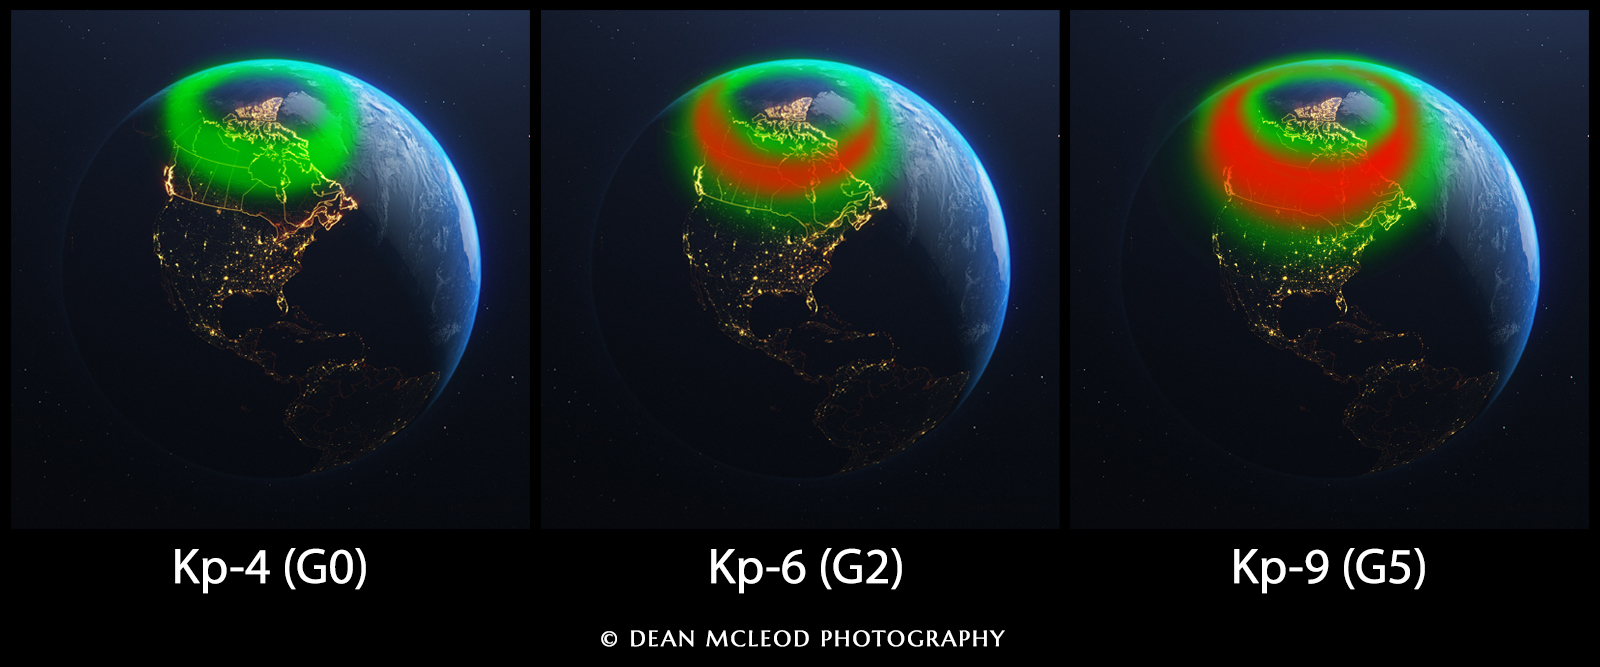
For auroras to be visible to the naked eye away from city lights, activity typically needs to reach at least Kp-5. Kp-6 can produce strong displays, Kp-7 is rare and highly active, Kp-8 is exceptional, and Kp-9 represents extreme geomagnetic storms.
The solar cycle is an approximately 11-year pattern in the Sun’s activity, shifting between quiet and highly active periods that directly influence aurora frequency and intensity.
As of 2026, Earth is in Solar Cycle 25, with solar maximum occurring between 2023 and 2026. This period has already produced some of the strongest aurora events in recent years, with further activity expected as solar maximum continues.
Understanding this cycle is essential, as solar activity is one of the most important factors in predicting aurora strength and visibility. By tracking CMEs and solar conditions, it becomes possible to anticipate major aurora storms with reasonable accuracy.
Resources For Predicting Aurora
Although auroras can occur at any time of year, increased solar activity is usually linked to the most vivid and frequent displays. Several global monitoring agencies track solar conditions and geomagnetic activity in real time, and many provide free alerts and forecasting tools.
Aurora alerts can help you identify the best times to head outdoors, especially when combined with local weather and moon phase conditions.
1. Official Space Weather Monitoring
One of the most reliable sources for aurora forecasting is the National Oceanic and Atmospheric Administration (NOAA), which provides real-time space weather monitoring and geomagnetic storm alerts.
Many of these services allow you to subscribe to notifications for geomagnetic activity, including Kp-index forecasts and storm warnings.
Alerts are issued in UTC time (Coordinated Universal Time), which is the global standard used for scientific and aviation timing.
To convert UTC to your local time, simply compare it with your local time zone offset. For example, Saskatchewan is UTC -6, meaning local time is six hours behind UTC.
Understanding this conversion is essential when reading aurora alerts, since geomagnetic storm windows are always published in UTC.

2. Apps and Forecasting Tools
There are several free and paid mobile apps that help track aurora activity and forecast visibility in real time.
Popular tools include:
- My Aurora Forecast and Alerts
- SpaceWeatherLive
These tools combine solar wind data, cloud cover estimates, and Kp-index predictions to help you decide when to head outside.
3. Community Forecasting
Aurora watching communities are also a valuable real-time resource. Many regions have active groups where photographers and enthusiasts share alerts, sightings, and sky conditions, often through social media platforms. These communities can provide fast, on-the-ground updates that complement official forecasts, especially during periods of heightened solar activity.
Planning Your Shoot
Now that you are set up with an alert system via email or an app on your phone, the next key factor to consider is local weather conditions, which play a crucial role in whether or not the Northern Lights will be visible.
The best time to witness the Northern Lights typically spans from late September to early April, with peak activity during the winter months. Since auroras are primarily visible in polar regions, photographers living outside these zones often plan dedicated trips north to increase their chances of success.
The Northern Lights can be so intense during rare geomagnetic storms that they are visible far beyond the Arctic Circle. During extreme events such as Kp-8 or Kp-9 storms, auroras may even be visible across parts of the northern United States, although they often appear more diffused compared to the structured bands and rays seen at higher latitudes.
Clear, dark skies are essential for successful aurora photography. Light pollution from cities and towns significantly reduces visibility, even during strong solar activity. While light cloud cover is not always a deal-breaker, fully clear skies provide the best opportunity for sharp, well-defined aurora structure.

Monitoring cloud cover in advance helps you decide whether it is worth heading out. Light pollution maps are also useful for identifying darker regions away from urban areas.
Moon phase is another critical factor. Bright moonlight can significantly reduce the visibility of auroras in long exposures, often washing out faint colour and detail.
A new moon or post-moonset period provides the darkest skies and the highest level of contrast. However, some photographers prefer a partial moon—such as a crescent or quarter phase—as it can naturally illuminate foreground elements without artificial light.
Ultimately, the best results come from experimentation. Conditions rarely repeat exactly, and learning how auroras interact with different levels of darkness, moonlight, and atmospheric clarity is part of developing your own approach in the field.
Best Locations for Photographing the Northern Lights
When it comes to capturing the Northern Lights, location is one of the most important factors. Certain regions around the world are better suited to aurora photography due to their position near the auroral oval and their generally lower levels of light pollution.
However, seeing the aurora is never guaranteed, regardless of location. Extended cloud cover or low solar activity can limit visibility, even in the best regions. While northern latitudes increase your chances significantly, auroras remain a naturally variable phenomenon influenced by multiple environmental conditions.
Even in the best locations on Earth, aurora photography is never guaranteed—it is always a combination of timing, weather, and solar activity.
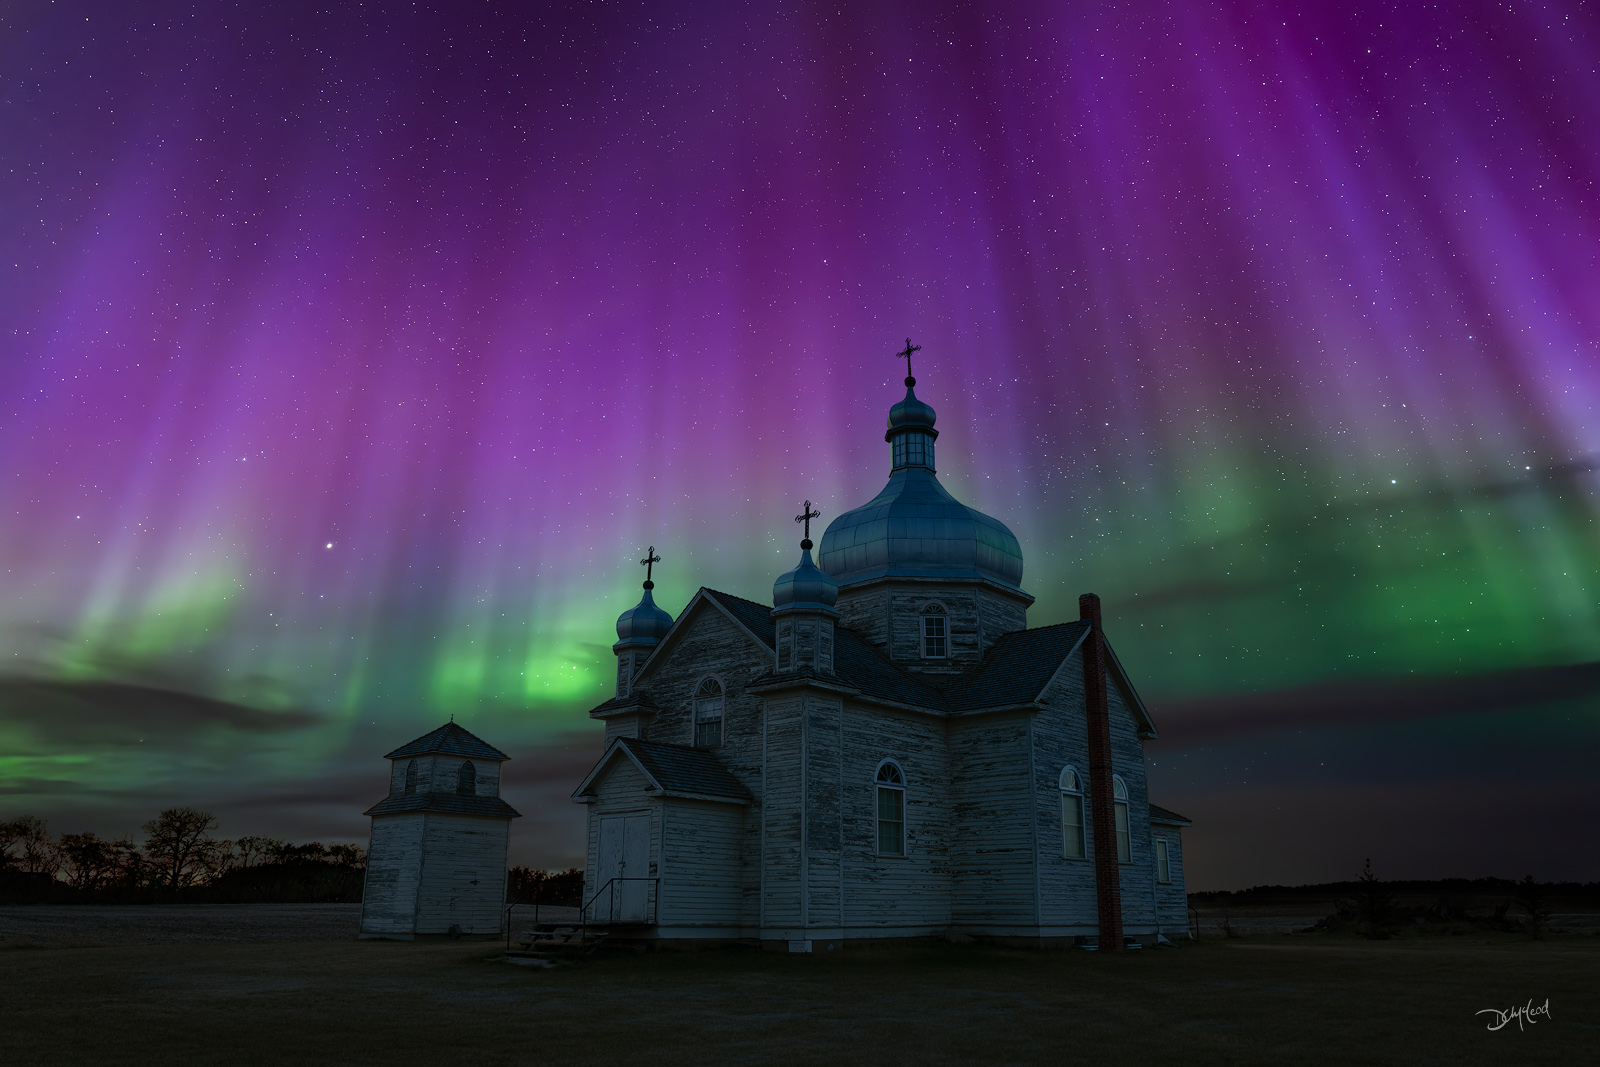
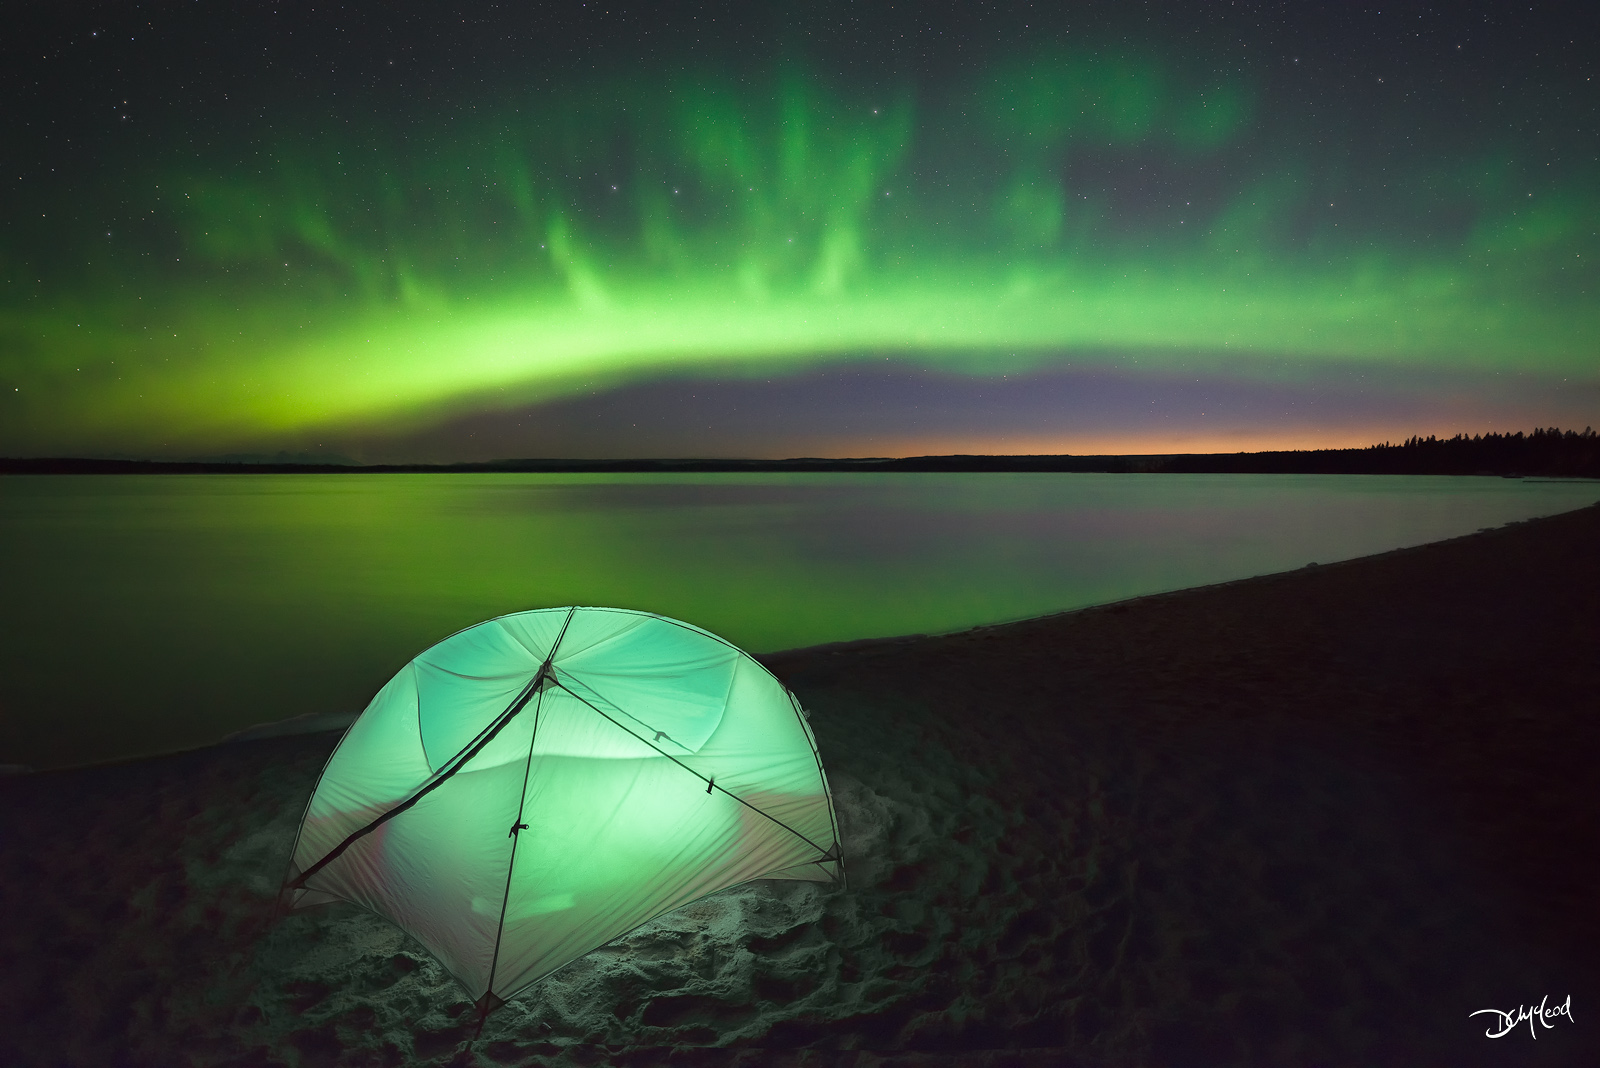
Strong aurora images are often defined not only by the lights themselves, but by the foreground elements that anchor the composition.
The following regions are among the most popular and reliable destinations for aurora photography and are worth considering if you plan to travel.
Iceland
Iceland is one of the most popular aurora photography destinations in the world, offering vast and dramatic landscapes including mountains, waterfalls, glaciers, and coastal regions. These environments provide strong foreground options for composition, especially when paired with active aurora displays.
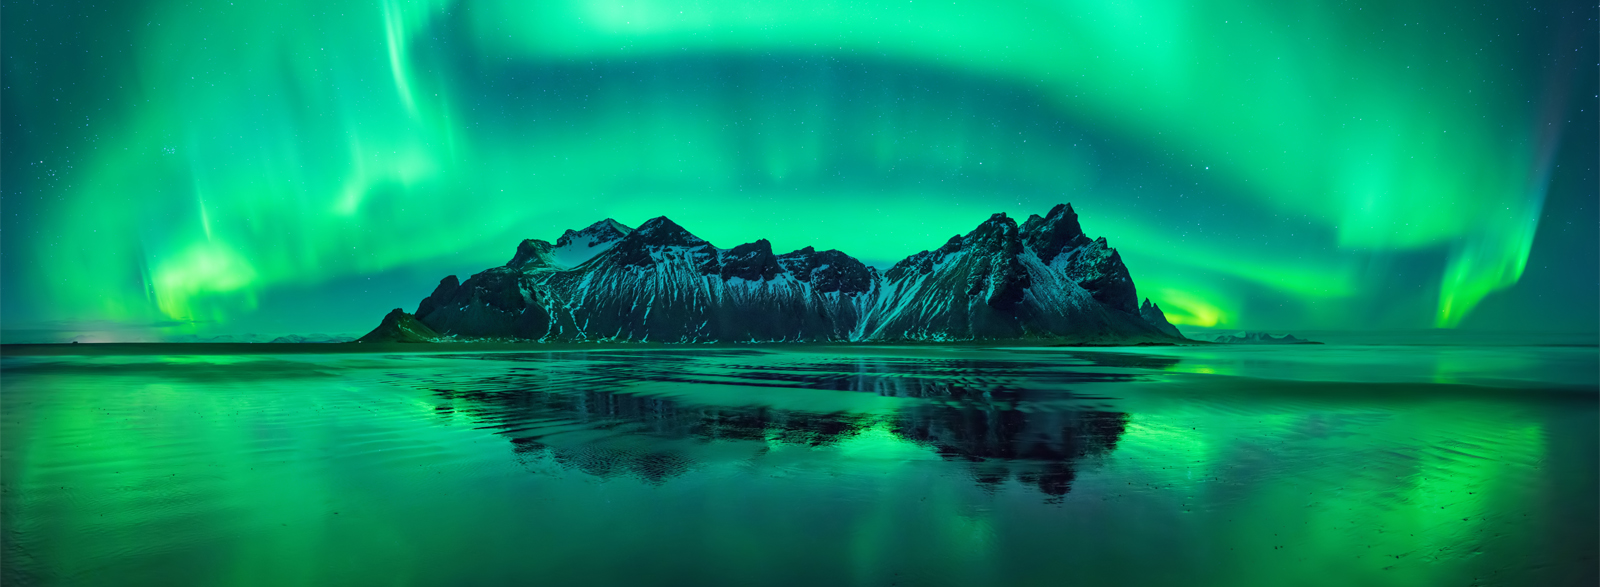
While Iceland can offer relatively mild coastal conditions in winter due to surrounding ocean currents, it is also known for rapidly changing weather and challenging driving conditions.
Norway
Norway is another prime aurora destination, particularly in regions such as Tromsø and the Lofoten Islands. Tromsø sits within the auroral oval, making it one of the most reliable locations in the world for Northern Lights activity.
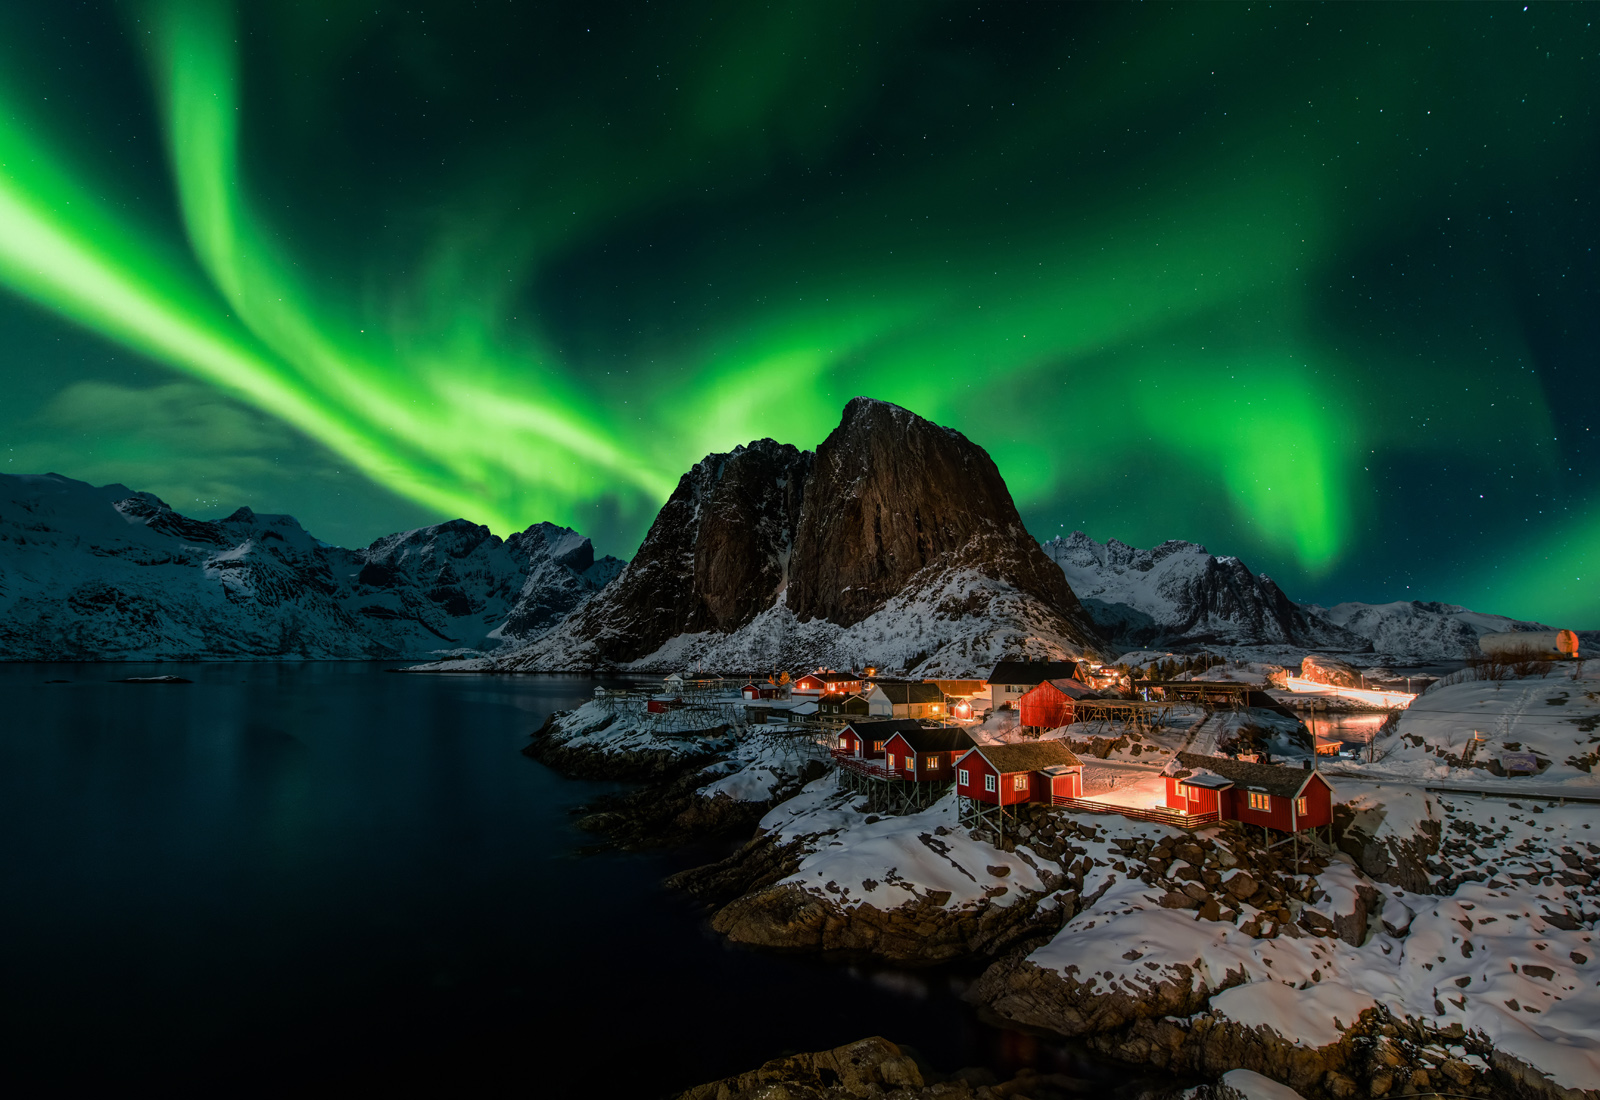
The Lofoten Islands combine dramatic mountain peaks, fjords, and coastal villages, creating powerful foreground compositions when paired with auroral activity.
Canada
Canada offers some of the most accessible and consistent aurora viewing in North America, particularly in Yukon and the Northwest Territories. Yellowknife is often referred to as the “Aurora Capital of North America” due to its clear skies and long viewing season.
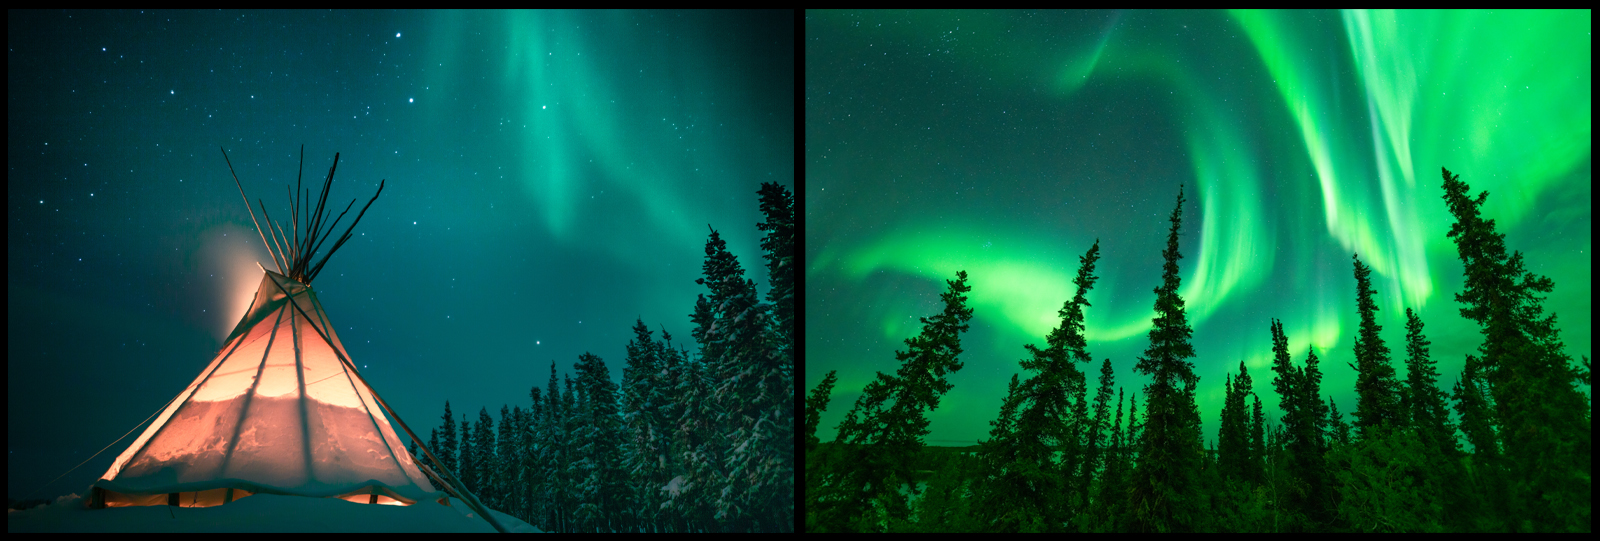
The surrounding landscapes—frozen lakes, boreal forests, and snow-covered terrain—provide strong natural foregrounds for aurora photography.
The most compelling aurora images are often defined as much by the landscape as they are by the light itself.
Local Exploration
If you live in a northern region, it is worth spending time scouting nearby locations in advance. Identifying strong foregrounds ahead of time allows you to react quickly when aurora conditions are favourable, rather than searching in the dark during a limited window of activity.
Essential Gear and Equipment
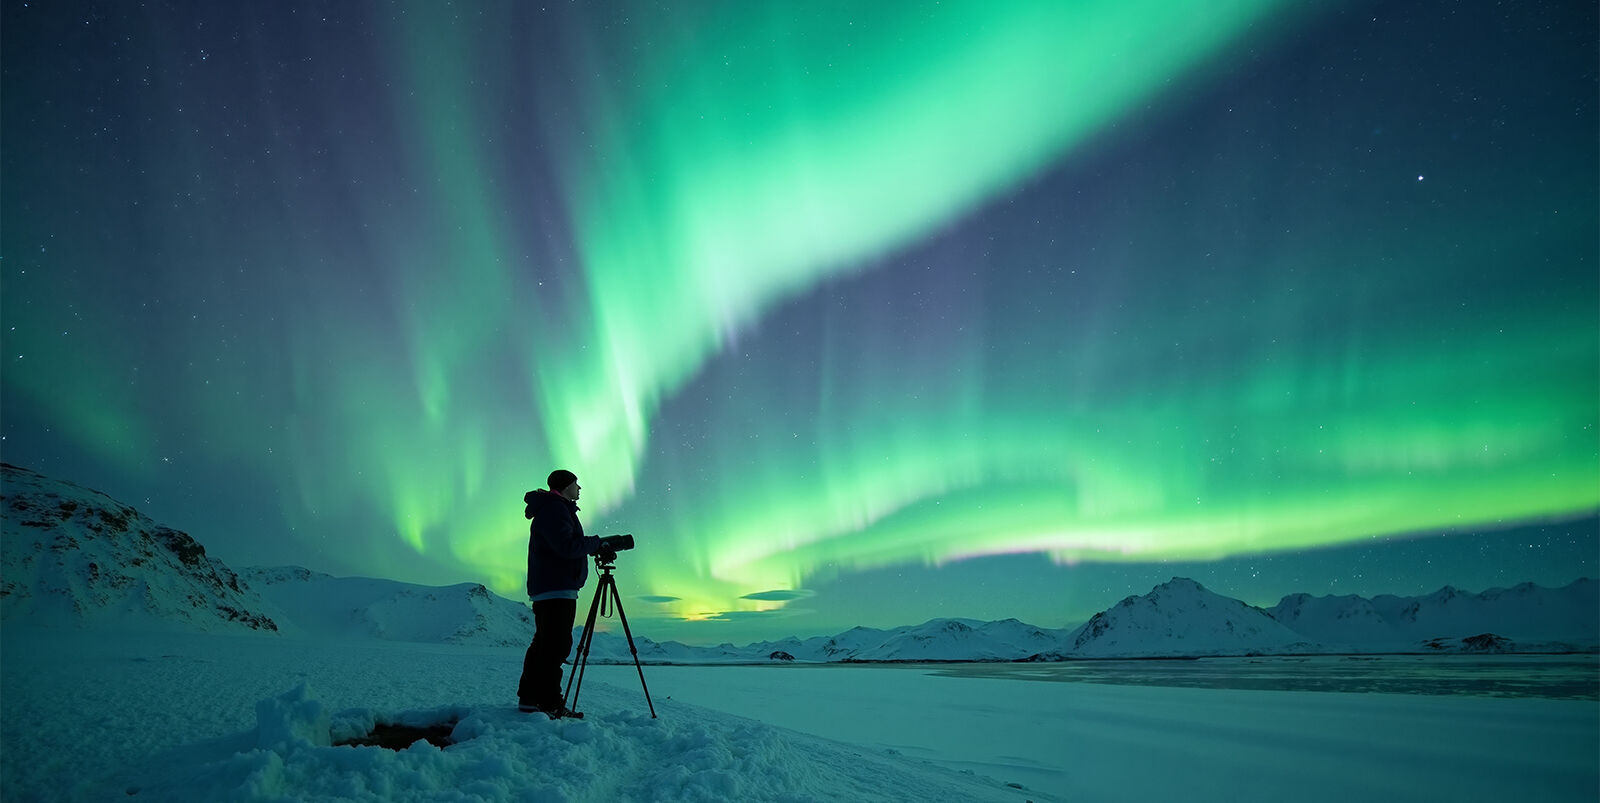
To effectively photograph the Northern Lights, having the right camera equipment is essential. A DSLR or mirrorless camera with full manual control is strongly recommended, as it allows precise adjustments to shutter speed, aperture, and ISO in low-light conditions.
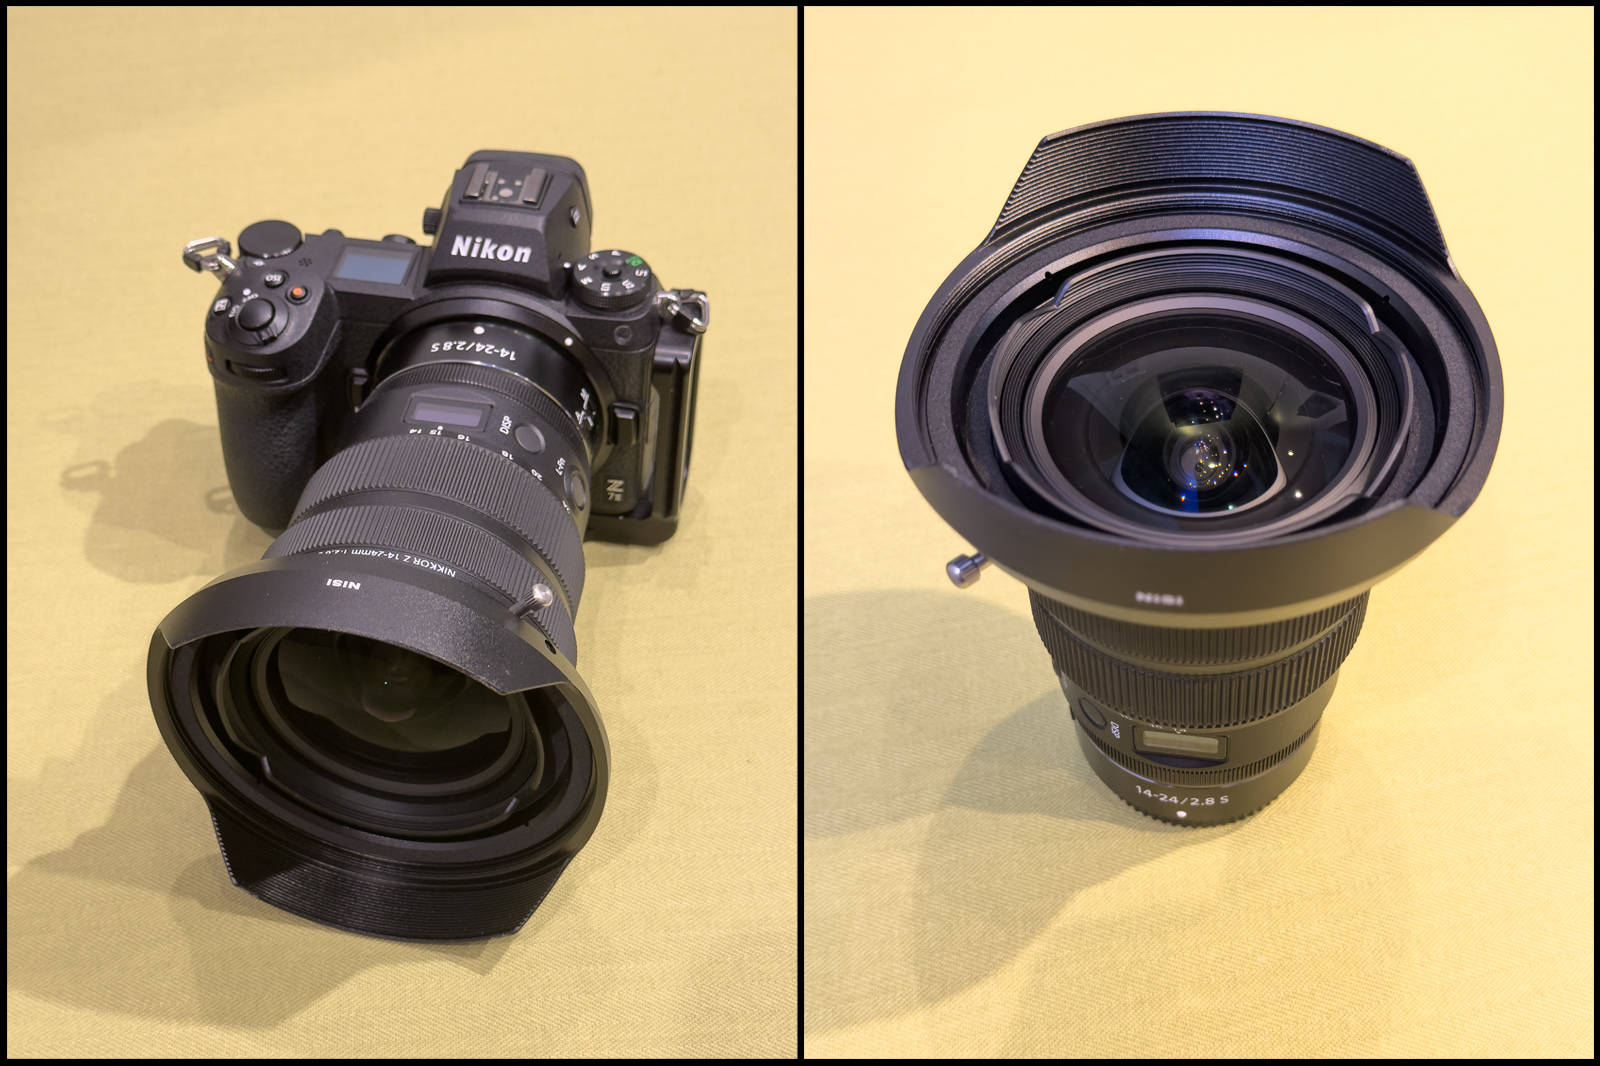
While crop sensor cameras can still produce good results, a full-frame camera is generally preferred due to its stronger low-light performance and reduced digital noise. Shooting in RAW format is also essential for maximum image quality and flexibility in post-processing.
A wide-angle lens is ideal for aurora photography, typically with a maximum aperture of f/2.8 or wider. These lenses allow you to capture more of the night sky while gathering more light, which is critical in dark environments.
Wide-angle lenses are especially effective for aurora photography because they allow you to balance both the scale of the sky and the strength of the foreground in a single frame.
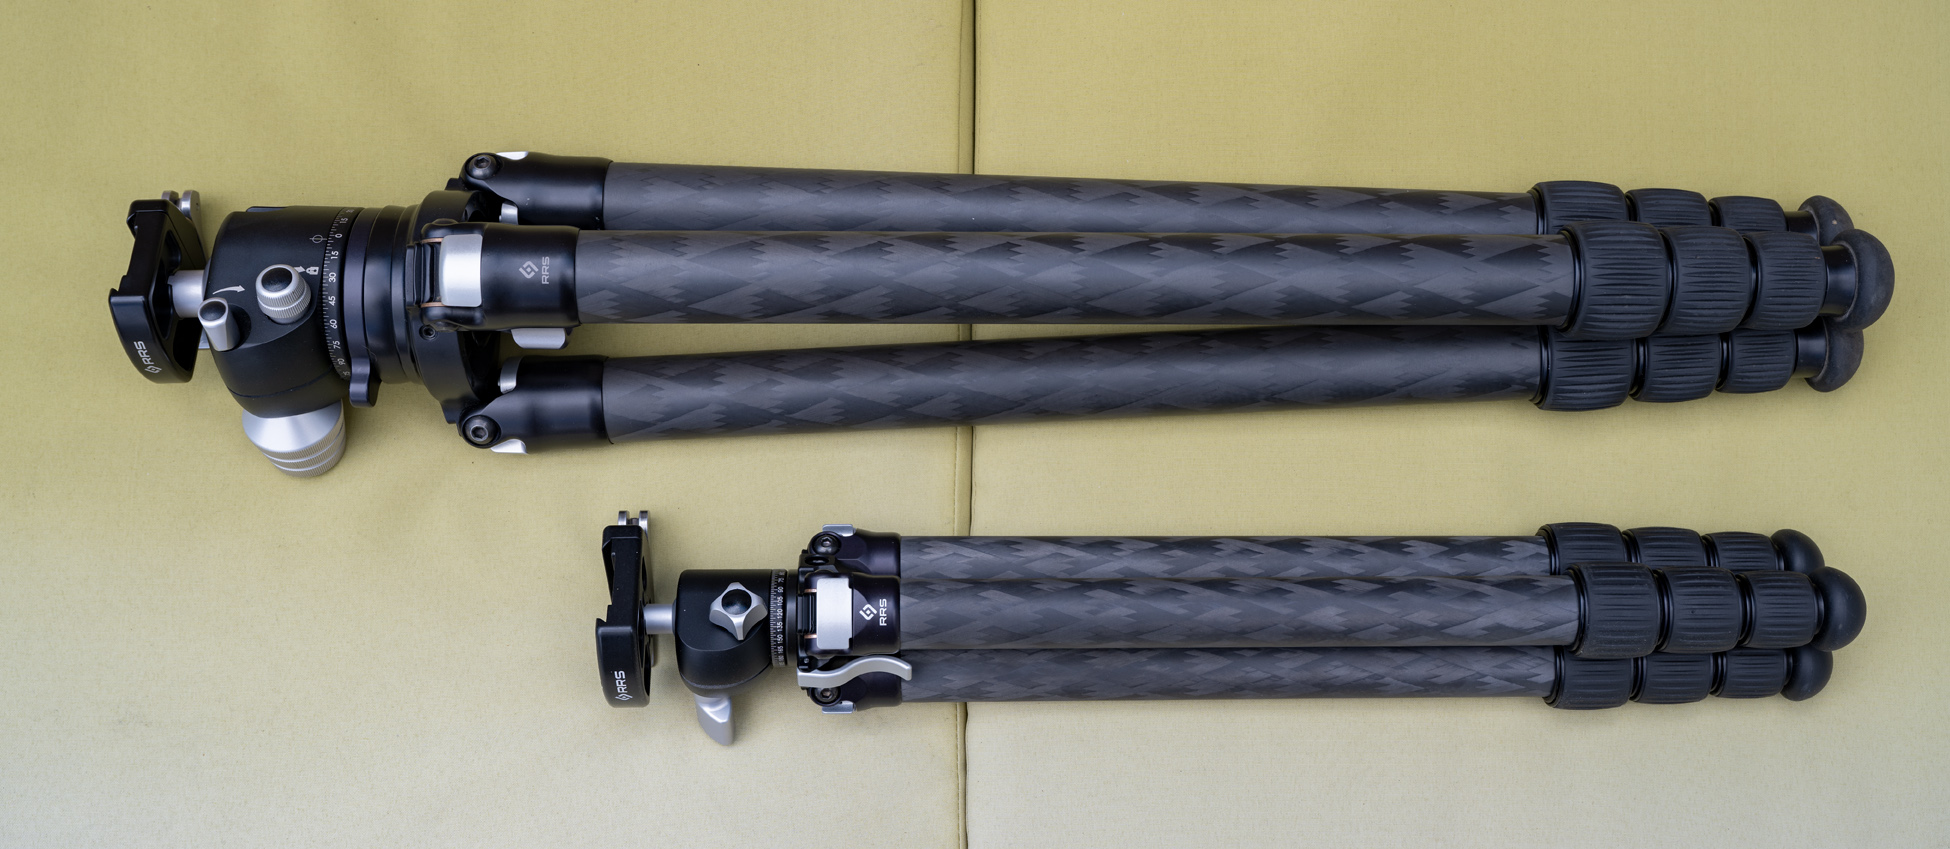
A sturdy tripod is another essential piece of equipment. Long exposures are required to capture aurora detail and colour, and even small movements can introduce blur. A ball head provides flexibility for quick composition changes, while an L-bracket allows easy switching between horizontal and vertical framing.
Using a remote shutter release or the camera’s exposure delay function helps eliminate vibrations caused by pressing the shutter button. A 2–4 second delay is usually sufficient for sharp images.
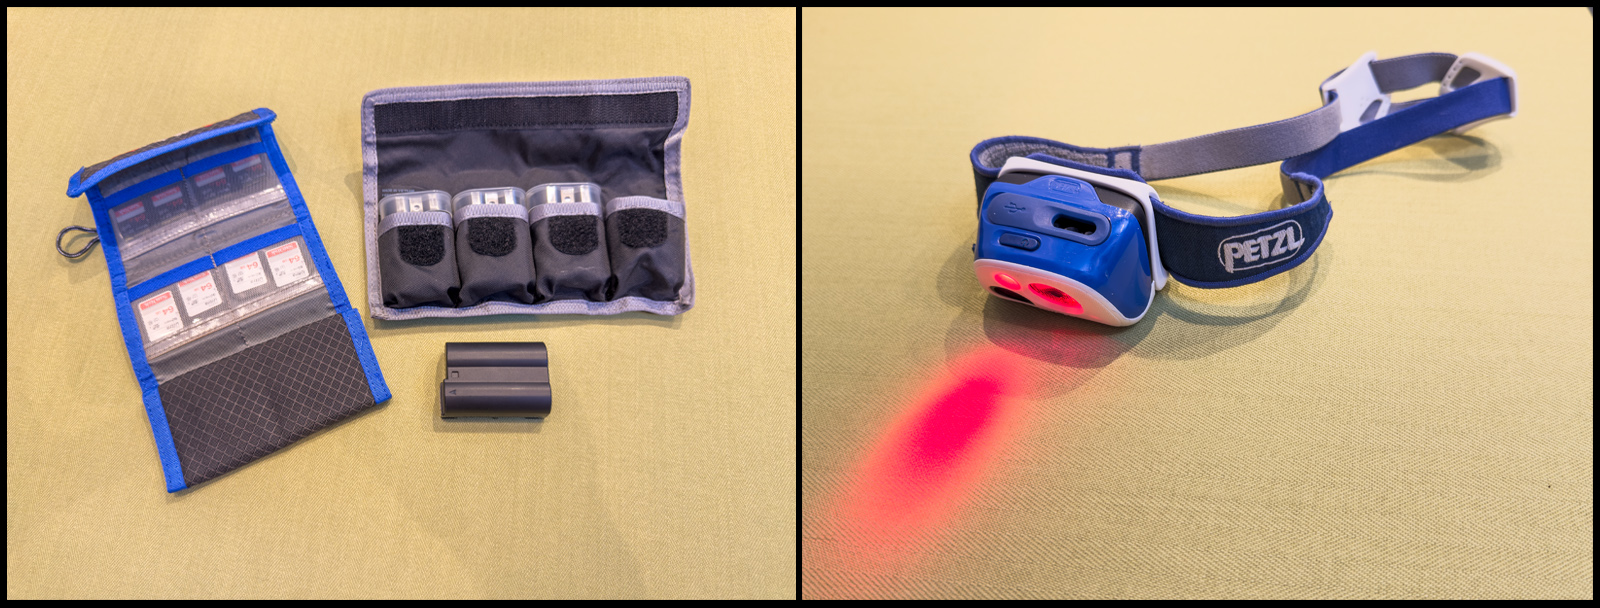
Cold weather accessories also play an important role. Extra batteries should always be carried, as low temperatures can drain power quickly. Keeping spares inside an inner jacket pocket helps preserve battery life. Plenty of memory cards are also essential to avoid running out of storage during active aurora conditions.
A headlamp with a red light mode is highly recommended, as it allows you to work in the dark without affecting your night vision.
Comfort and warmth are not optional in aurora photography—they directly affect how long and how effectively you can shoot.
Proper clothing is essential when working in winter conditions. Layers, insulated boots, gloves, and head protection all contribute to comfort during long exposure sessions. Hand warmers can also be useful for keeping dexterity in your fingers during extended shooting periods.
By preparing your equipment and clothing in advance, you can focus entirely on the conditions in front of you and the process of capturing the Northern Lights.
Camera Settings and Focusing
Using the right camera settings is crucial for successfully photographing the Northern Lights. While shutter speed and ISO will always vary depending on conditions, several core settings remain consistent.
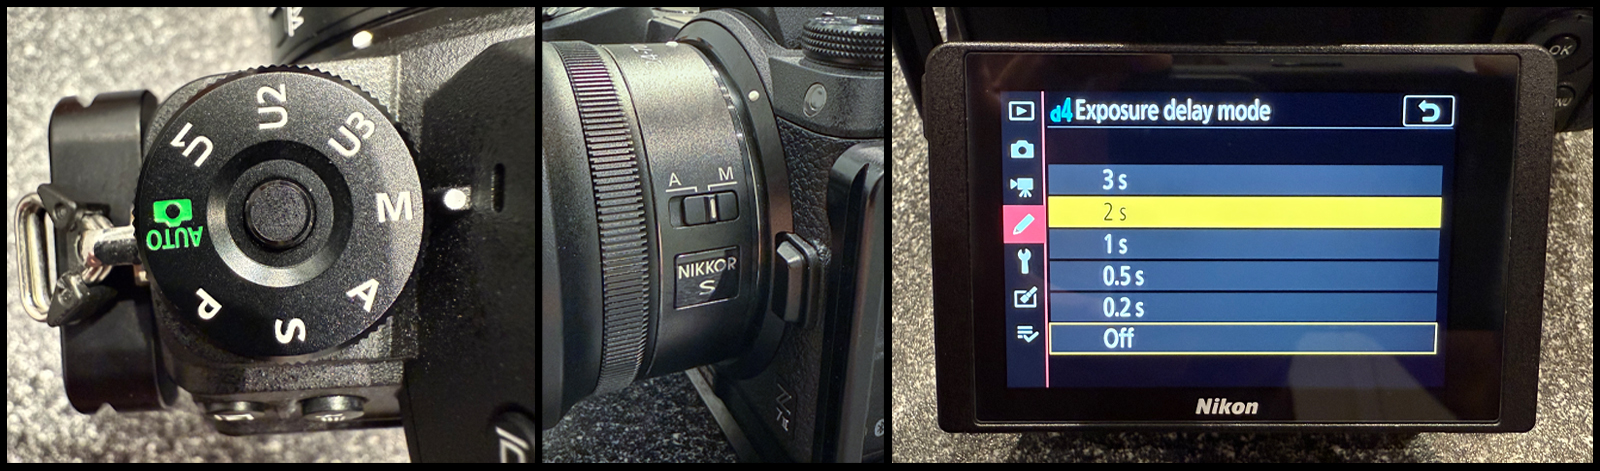
• Start by setting your camera to manual mode to allow full control over exposure.
• Set your lens to manual focus, and choose your widest available aperture (typically f/2.8 or wider) to maximize light intake. This can vary depending on your lens, ranging from f/1.2 to f/4.
• If your camera has exposure delay mode, set it to 2–3 seconds. This helps eliminate vibration caused by pressing the shutter button.
• Set image quality to RAW to preserve maximum detail and allow full flexibility in post-processing.
• Turn off long-exposure noise reduction. While it can reduce noise in some situations, it significantly slows down shooting and consumes unnecessary battery power during active aurora conditions.
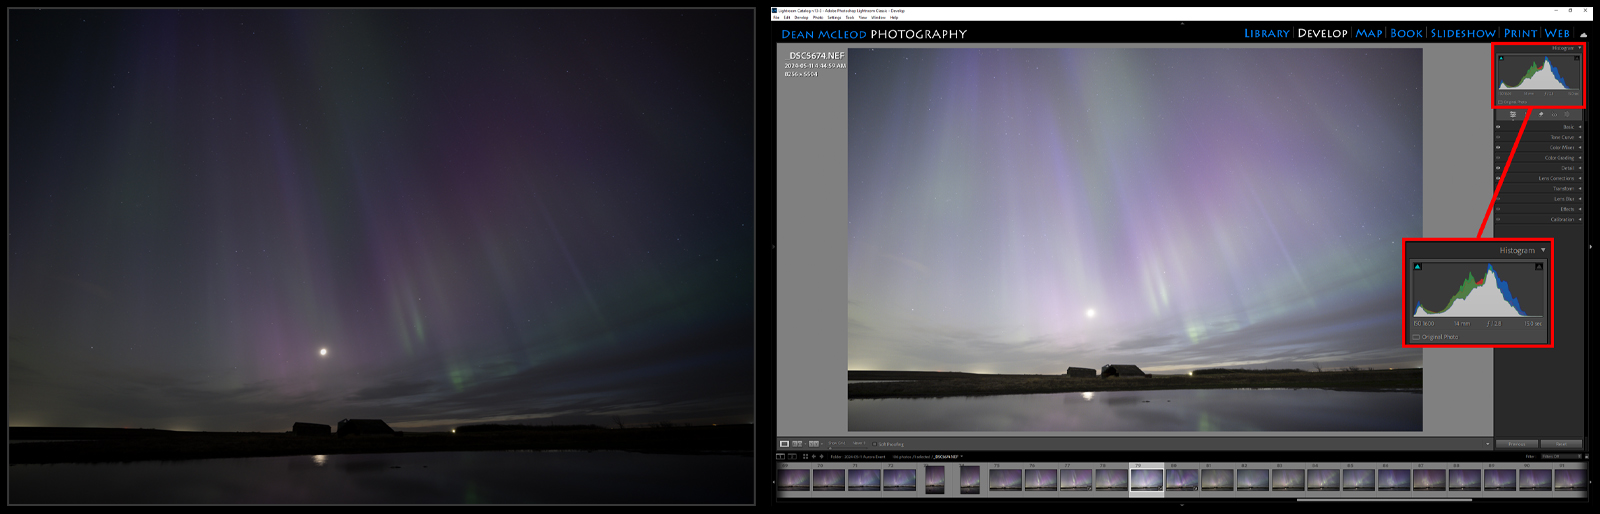
• Enable histogram display (including RGB if available) so you can accurately evaluate exposure in the field.
• Reduce LCD screen brightness, as screens often appear brighter in dark conditions and can lead to incorrect exposure judgments. Always rely on your histogram rather than the rear display.
In night photography, your histogram is far more reliable than what you see on the LCD screen.
Focusing at Night
Accurate focus is critical in aurora photography. To ensure both foreground and stars remain sharp, you must achieve infinity focus.
While most lenses include an infinity symbol (∞), this is not always precise enough for critical sharpness.
A more reliable method is to set focus during daylight. Mount your camera on a tripod, set your intended focal length and aperture, and focus on a distant object (around 50 feet or more). Review the image at 100% magnification in live view and adjust until both the subject and horizon are sharp. This establishes true infinity focus for your setup.
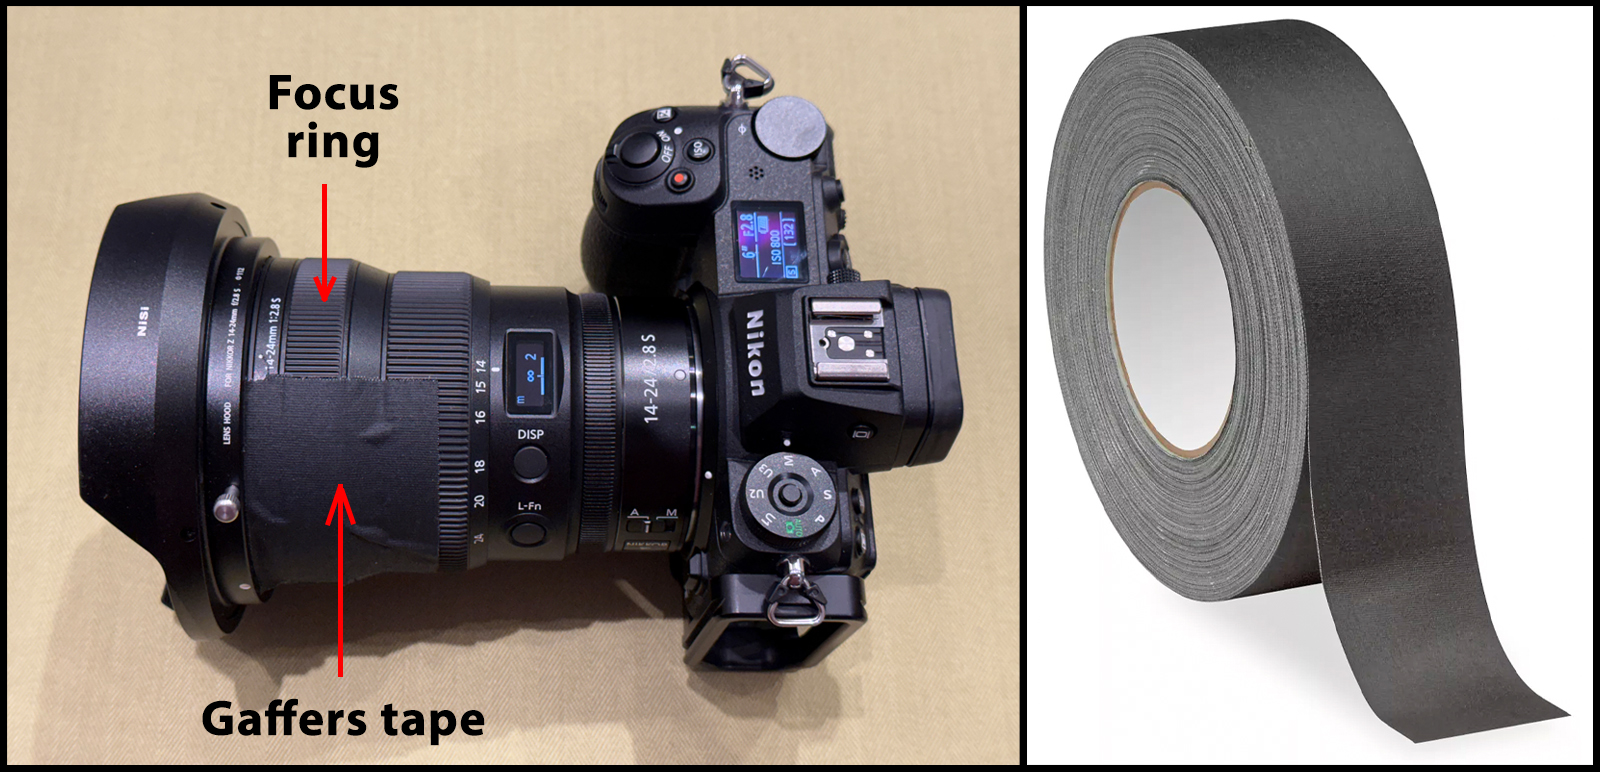
Once achieved, secure your focus ring using gaffer tape to prevent accidental movement. If you change focal length, you will need to refocus.
Locking focus before nightfall is one of the simplest ways to ensure consistently sharp aurora images.
Infinity focus can also be achieved at night with practice. Use a bright star, distant light, or the moon as a reference point. In live view, zoom in fully and adjust focus manually until the point of light appears as sharp as possible.
Regularly check focus throughout your shoot, as accidental movement can easily occur without noticing.
Exposure Settings
Aurora exposure is controlled by a combination of shutter speed and ISO, both of which depend on aurora brightness and movement speed.
A general starting point is:
- 2–6 seconds for fast-moving or bright aurora
- 15–25 seconds for slower or faint aurora
Avoid exposures longer than 25 seconds, as Earth’s rotation will begin to introduce star movement.
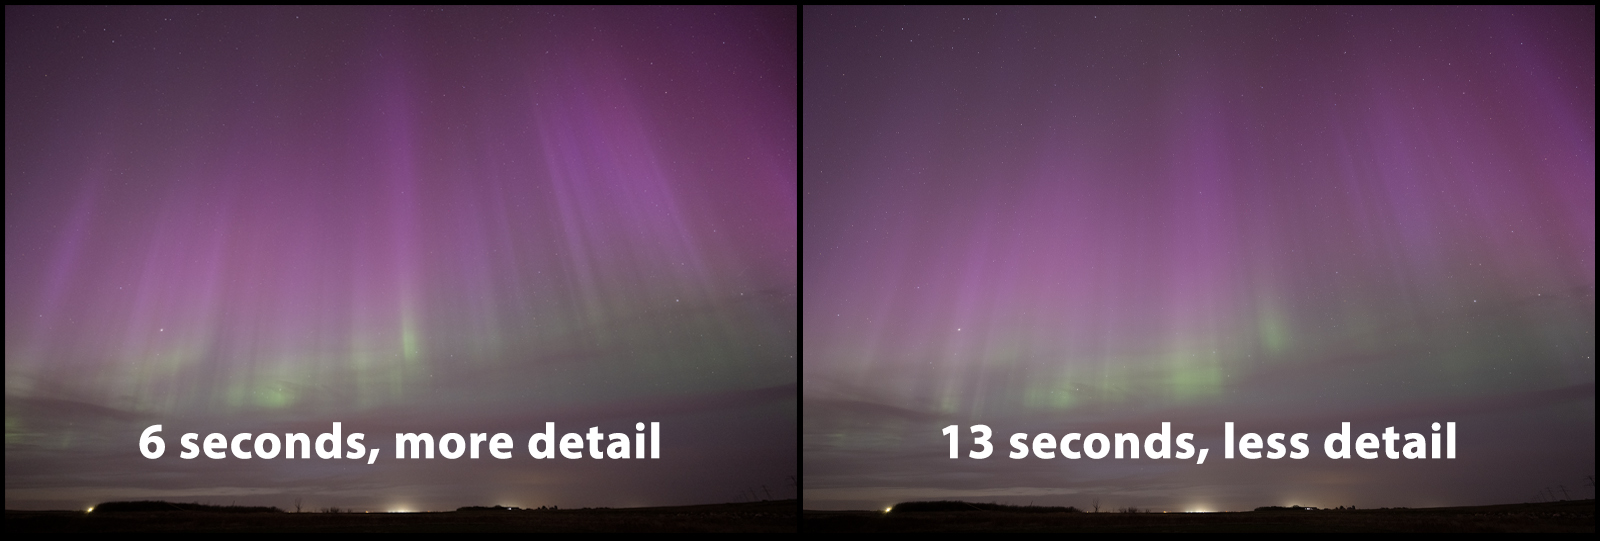
Aurora photography is a balance between capturing light and preserving motion—longer exposures often smooth detail, while shorter exposures preserve structure.
Comparing exposures, shorter shutter speeds often retain more defined aurora structure, while longer exposures can introduce unwanted motion blur, especially in fast-moving displays.
ISO Control
ISO determines your camera sensor’s sensitivity to light. Higher ISO values brighten the image but also introduce digital noise.
A common starting range is ISO 800–1600, though this may need to increase to 2000–3200 in low-light conditions or during faint aurora activity.
The goal is to find the lowest ISO that still produces a properly exposed image while maintaining detail.
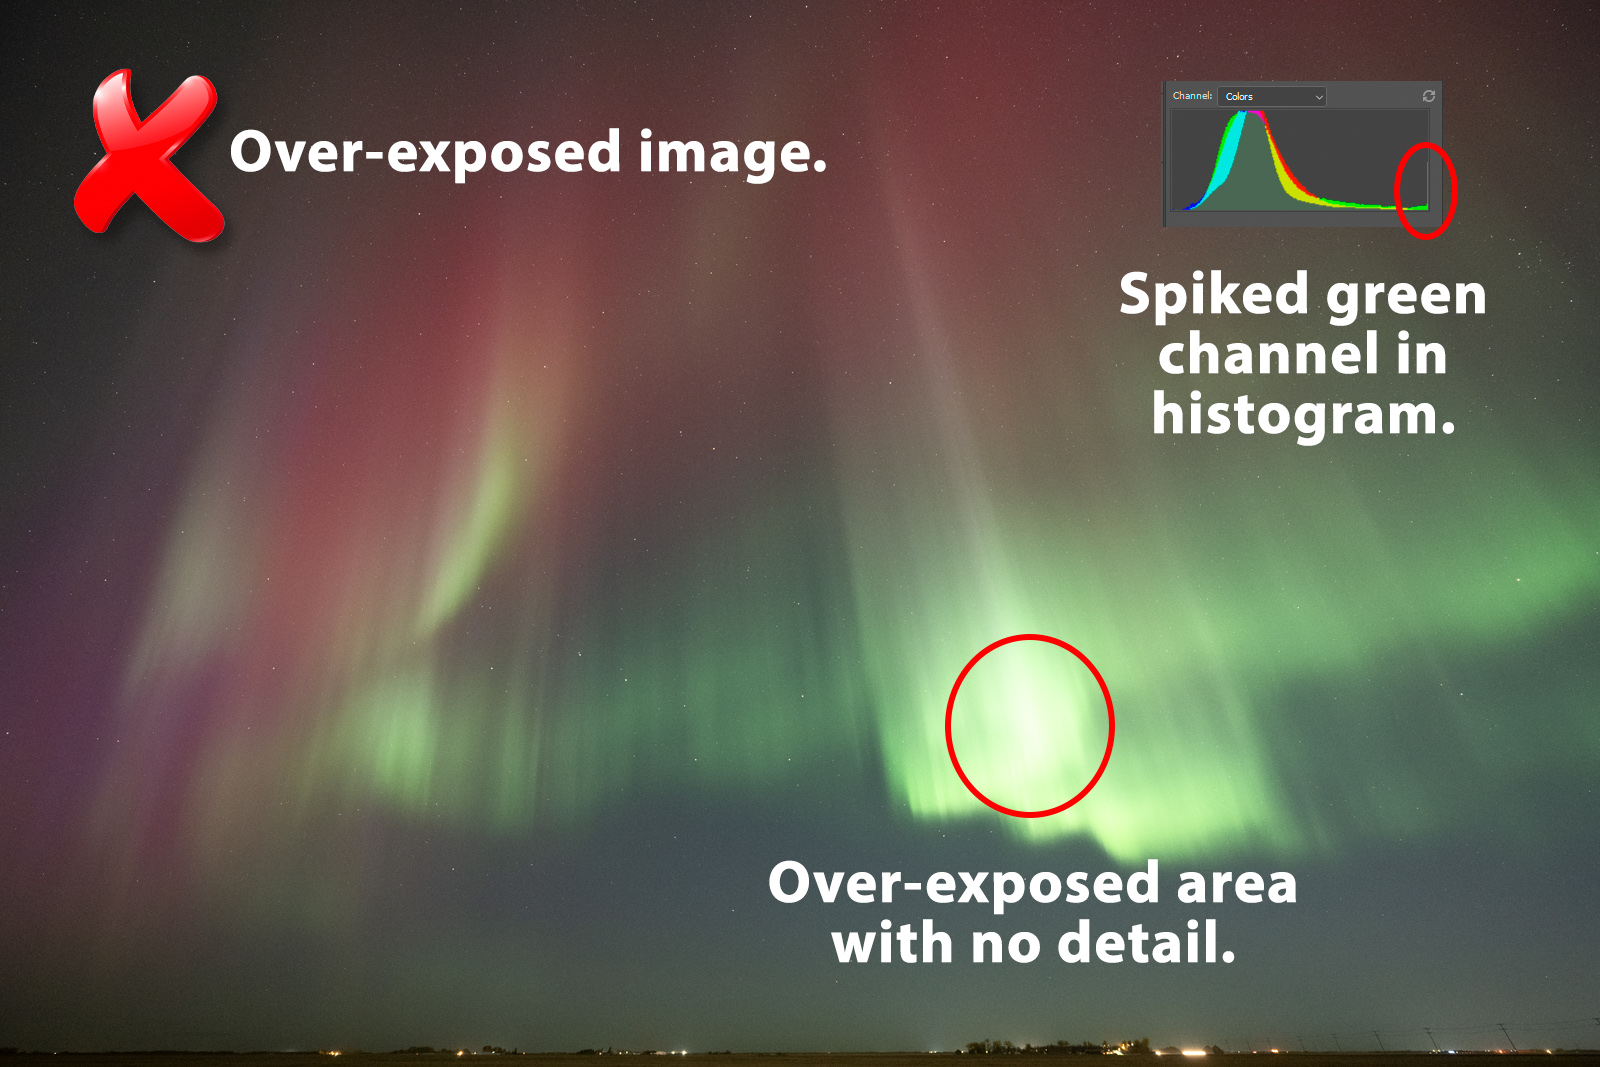
Review your histogram regularly to ensure proper exposure:
- Spikes on the right indicate overexposure
- Spikes on the left indicate underexposure
Adjust ISO and shutter speed until the histogram is balanced without clipping either end.

The best aurora images are achieved by balancing exposure brightness with minimal ISO noise, not by pushing either setting to extremes.
Tips for Composing Your Aurora Photos
Composition plays a vital role in creating compelling Northern Lights photographs. A useful starting point is the rule of thirds, which divides your frame into nine equal parts and positions key elements along these lines or at their intersections.
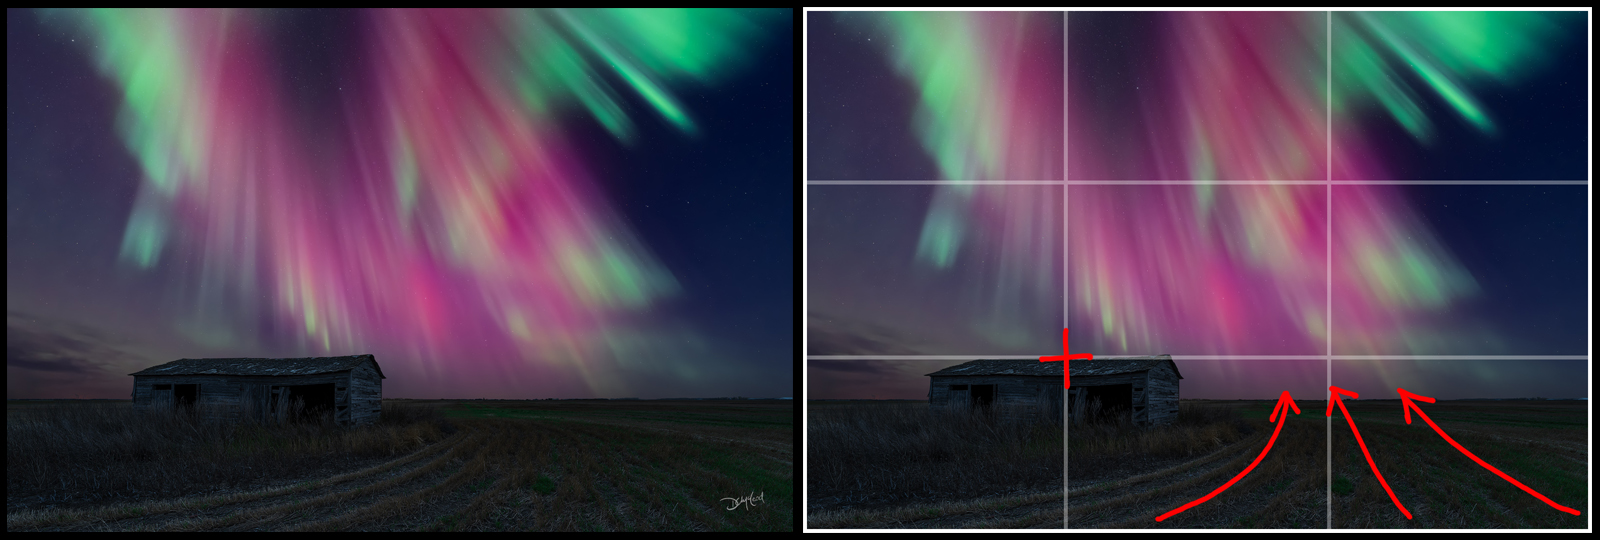
This approach helps create balance while naturally guiding the viewer’s eye through the image. Foreground elements such as paths, rivers, or leading lines can further direct attention toward the aurora and add depth to the scene.
The placement of your horizon line is also important. Since aurora photography often emphasizes the sky, positioning the horizon lower in the frame can enhance the sense of scale and make the display feel more expansive.
Strong aurora compositions are not just about the sky—they rely on foreground elements to create depth, scale, and visual interest.
When setting up in the dark, a useful technique is to temporarily increase your ISO to create a brighter test image. This allows you to quickly evaluate and refine your composition before returning to your desired exposure settings.

Including interesting foreground subjects such as trees, mountains, or structures adds context and storytelling to your images. Reflective surfaces like water or ice can further enhance a composition by mirroring the colours and movement of the aurora.
Reflections can transform a good aurora scene into a much more dynamic and visually engaging image.
Experimenting with different angles and perspectives is key. Moving around your location and exploring alternative viewpoints will help you create a more diverse and compelling set of images.
Editing Tips For Aurora Images
Aurora photography often reveals far more detail and colour than is visible to the naked eye. Long exposures allow the camera to capture subtle tones and structure that may appear faint or invisible in real time.
What your camera records during an aurora display is often dramatically richer than what you see with your eyes.
Once you’ve captured a well-exposed image, thoughtful post-processing can significantly enhance the final result.

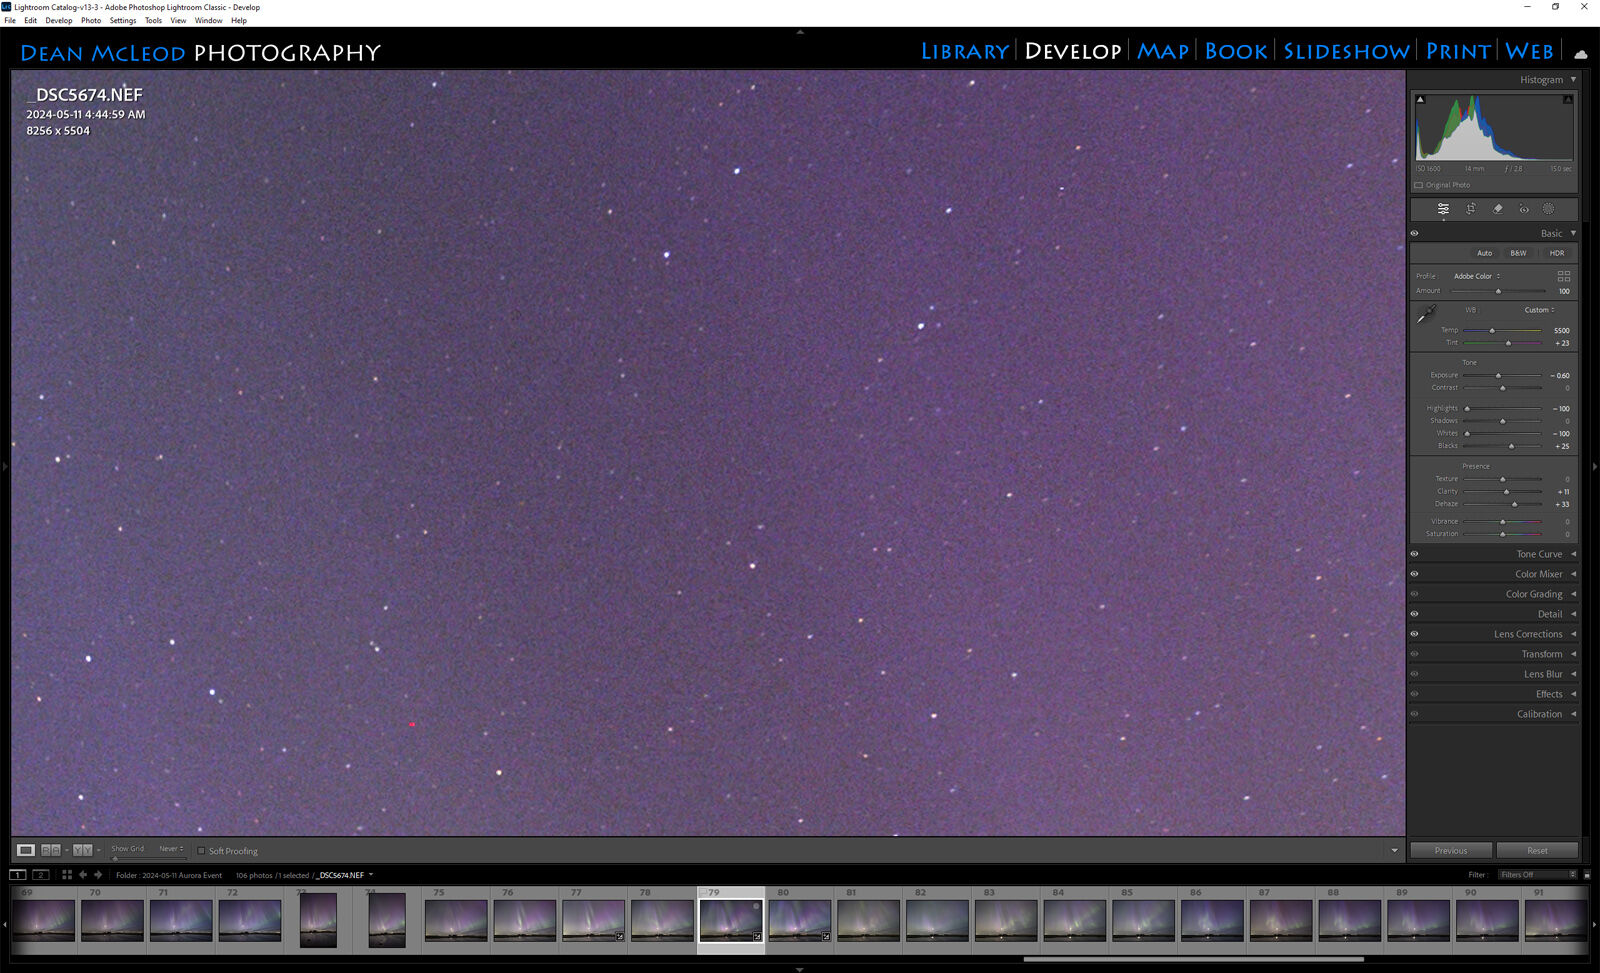
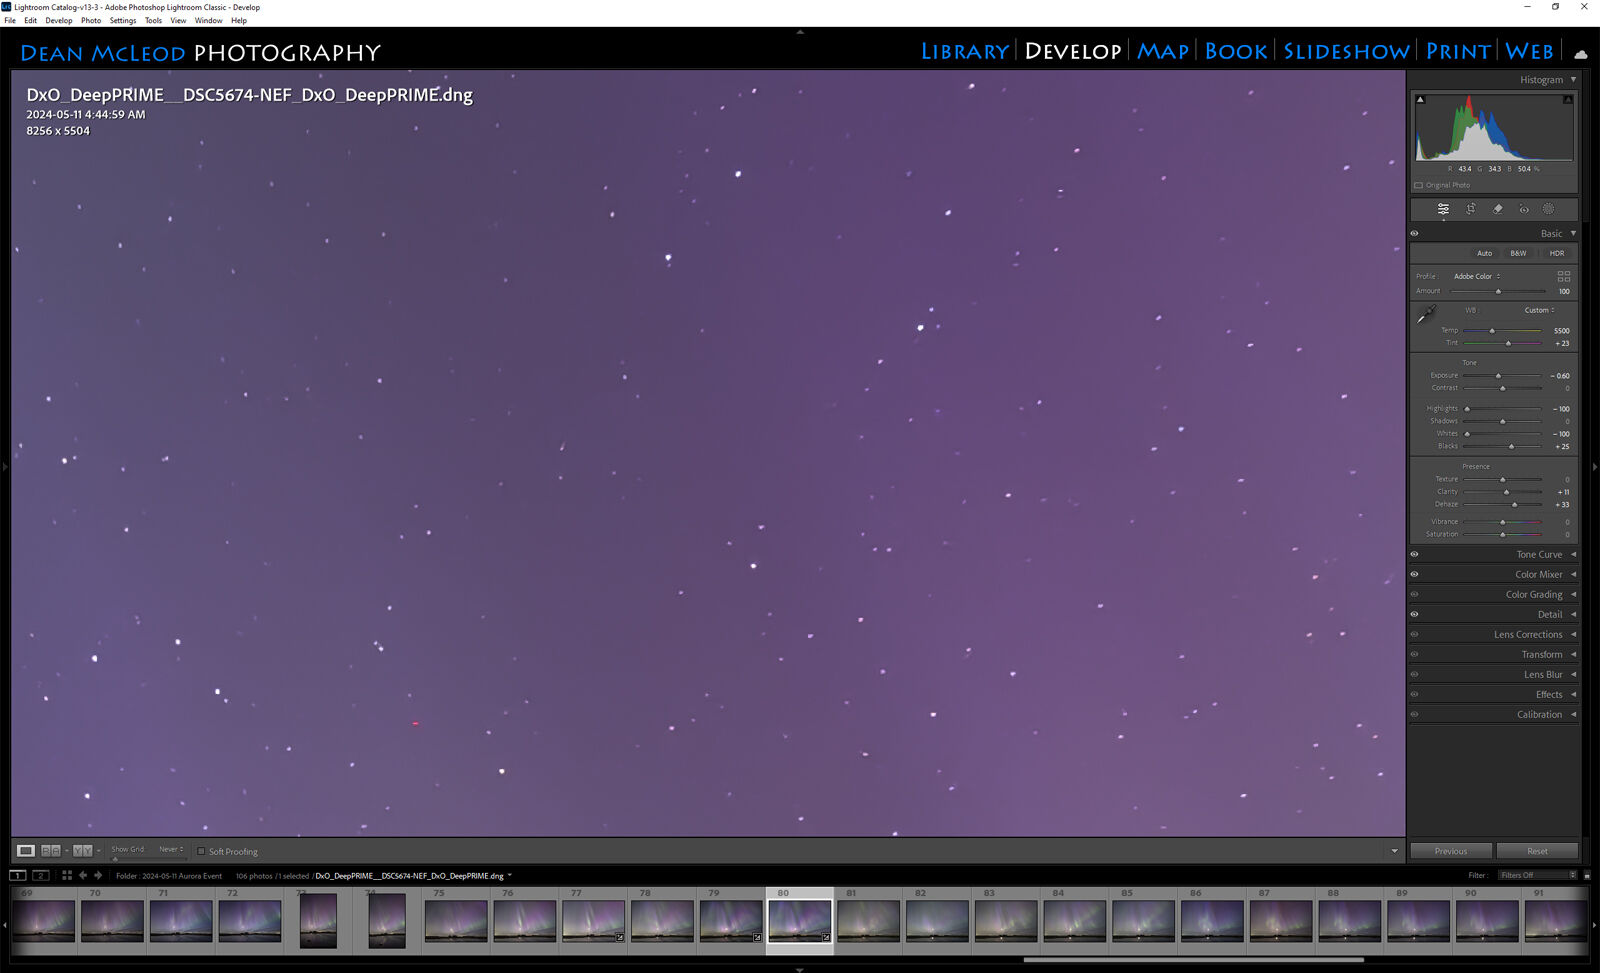
Because aurora images are typically shot at higher ISO values, digital noise is always a factor. The larger the final image—especially in print—the more visible this noise becomes.
For this reason, noise reduction should be the first step in your workflow.
Effective noise reduction early in the editing process results in cleaner, higher-quality final images.
Lightroom Workflow
• Begin in the Detail panel by setting sharpening to zero, as it can exaggerate noise in low-light images.
• Use the Denoise feature to reduce noise and create a cleaner base file. Additional noise reduction can then be applied using the Luminance slider, but avoid pushing it too far to preserve fine detail.
• Enable Lens Corrections to remove chromatic aberration and correct lens distortion and vignetting.
• Adjust overall exposure carefully while monitoring the histogram to avoid clipping highlights.
• White balance can be refined using temperature and tint controls to achieve a natural colour balance.
• For contrast, avoid relying solely on the global contrast slider. Instead, use a combination of highlight, white, and tone curve adjustments to create more controlled and natural-looking contrast.
• Subtle use of tools like Dehaze and Clarity can enhance structure and depth, but should be applied conservatively.
• Local adjustments such as gradients and brushes can help balance exposure across the frame.
• I avoid the HSL sliders, as they are too selective and can cause unwanted artifacts and banding in colour graduations. I prefer to use Selective Color layers in Photoshop later which is much more refined.
For a deeper look at how I approach advanced noise reduction in my workflow, I cover the process in more detail in my DxO PureRAW guide.
Advanced Photoshop Processing
After completing your primary adjustments, you can move into Photoshop by selecting Edit In > Open as Smart Object in Photoshop for further refinement using Smart Objects to preserve flexibility.
Layer-based editing allows for far more precise control over colour, contrast, and tonal balance than global adjustments alone.
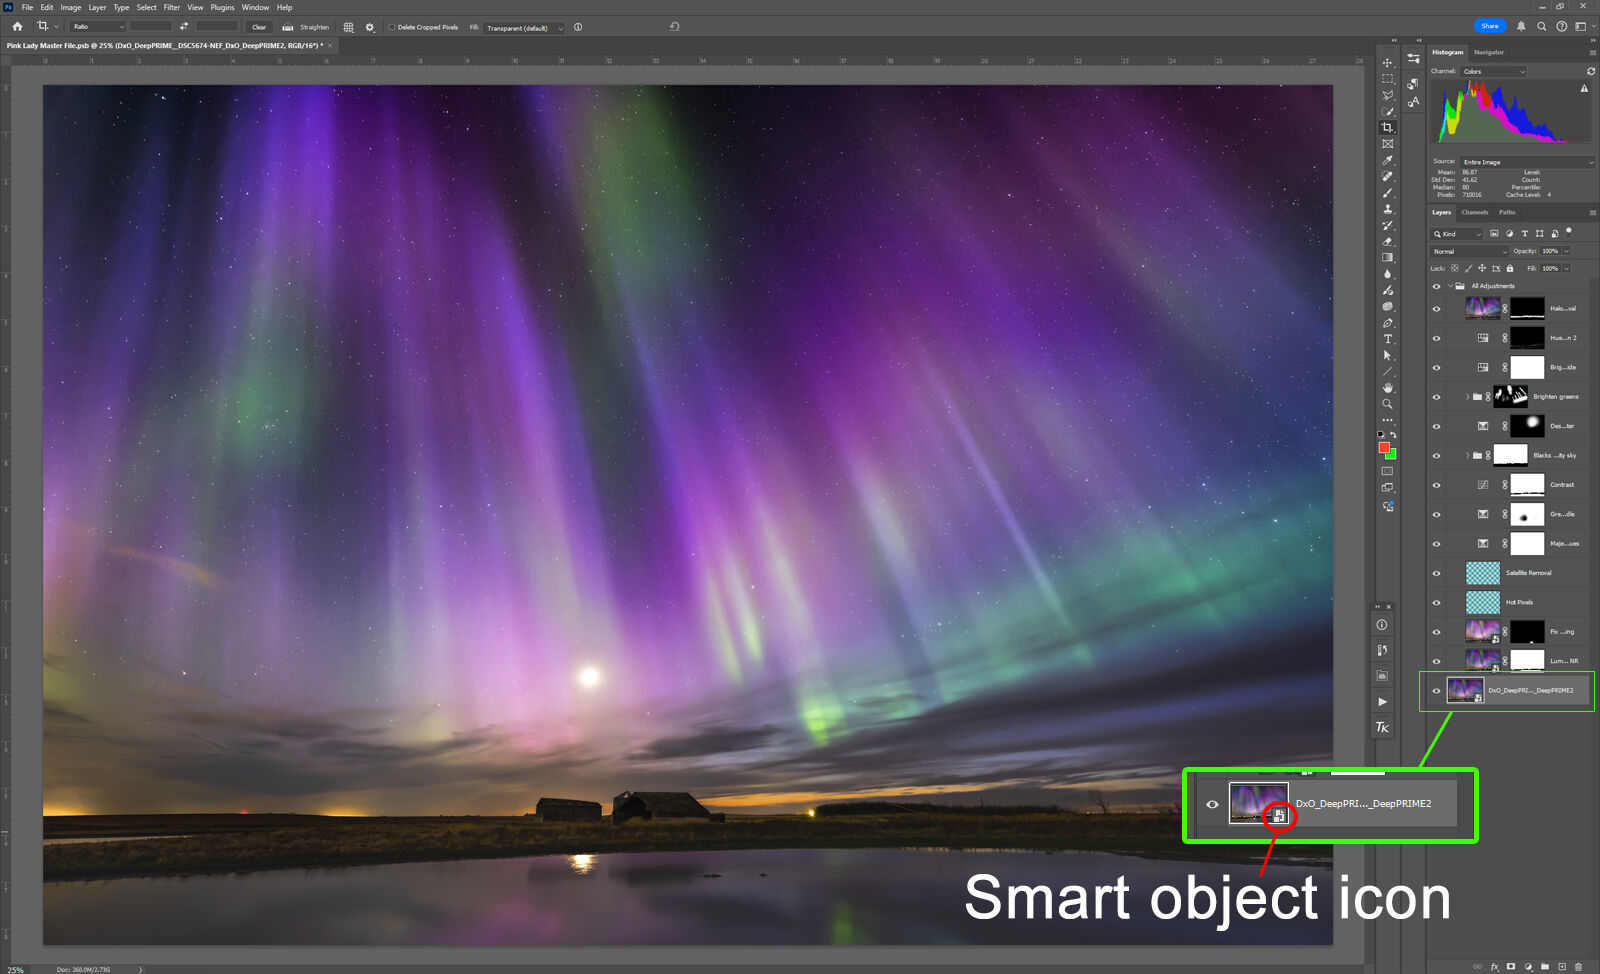
Common refinements include:
- zooming to 200% and removing hot pixels caused by long exposures
- enhancing contrast using Curves with a 'Darks' luminosity mask
- refining colour using Selective Color adjustments
- sharpening foreground elements for added depth
Preparing Images for Print
If you plan to print your work, colour accuracy becomes critical. Displays often show more saturation than can be reproduced on paper, which can lead to unrealistic expectations if not managed properly.
Images that look vibrant on screen can easily become oversaturated or inaccurate when printed if not properly prepared.
Calibrating your monitor and using appropriate colour profiles helps ensure that what you see on screen translates accurately to print.
Soft proofing allows you to identify colours that fall outside printable ranges and adjust them before final output.
Final Thoughts
Post-processing is where your aurora images are refined into their final form. While there are countless techniques available, consistency and restraint are key.
Strong editing enhances what was captured in the field—it should never overpower it.
With a disciplined workflow and careful adjustments, your Northern Lights images can be transformed into clean, detailed, and print-ready photographs that accurately reflect the scene.
Conclusion: Capturing the Magic
The Northern Lights are one of nature’s most extraordinary displays, and photographing them is both a technical challenge and a deeply rewarding experience. By understanding how auroras form, learning to read conditions, and preparing with the right tools and techniques, you can consistently create images that capture their beauty with clarity and intention.
But beyond the technical side, aurora photography is defined by patience. Unpredictable weather, long nights, and changing conditions are all part of the process, and each outing builds experience that cannot be learned any other way.
The most memorable aurora images are rarely the result of perfect conditions—they come from persistence, preparation, and being ready when the moment finally arrives.
Over time, you begin to recognize patterns, anticipate changes, and work more intuitively in the field. What once felt uncertain becomes second nature.
Aurora photography is not just about capturing light in the sky—it’s about learning to work with nature on its terms.
Prepare well, stay patient, and take every opportunity to get out under the night sky. With time in the field, you begin to recognize the moments that make great aurora photographs—and anticipate them before they happen.
For a deeper look at how I approach planning, gear preparation, and efficiency in the field, see my complete guide to landscape photography field tips.